

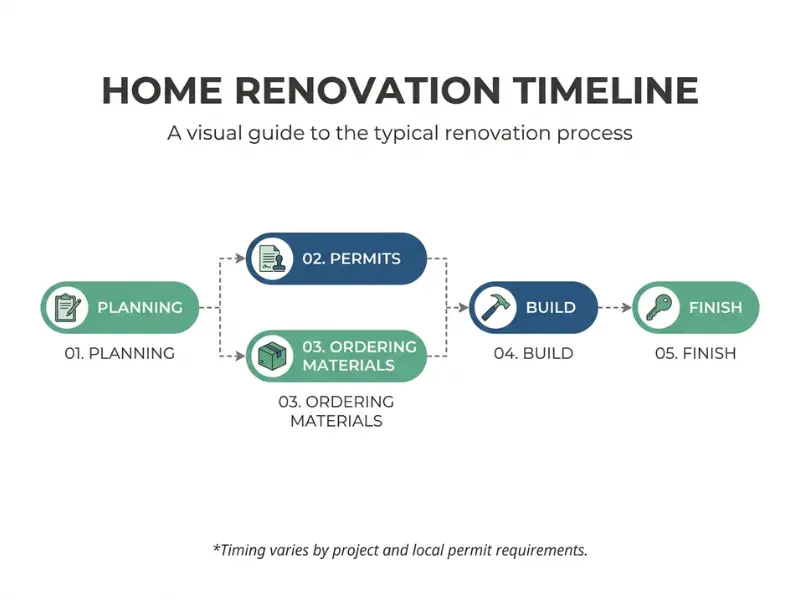
A home renovation checklist helps you do things in the right order. Start with your goals and budget. Then hire a licensed contractor, get permits, and order materials early. Next comes demolition, rough-in work for plumbing and electrical, inspections, drywall, paint, flooring, and trim. Finish with a punch list. Add 10 to 20 percent to your budget for surprises.
You picked the paint color. You saved a dozen photos. Then your contractor asks about permits, and you realize you have no idea what comes next.
We know how stressful this feels. A renovation touches your money, your home, and your daily life all at once. A home renovation checklist takes that weight off by giving you one clear path from idea to finished room.
Here you’ll find real numbers for your renovation budget, simple ways to hire a contractor you can trust, and a plan for the moment you open a wall and find something ugly. You’ll also see how long each stage usually takes.
Plus, you’ll get a simple rule that explains why the work happens in the order it does. Once you see the reason, the whole project makes more sense.
You won’t need to go back to Google when you finish. Start with the full home renovation checklist below, then we’ll break down each step.
What Should Be on Your Home Renovation Checklist?
Your checklist should have six phases: plan and budget, hire and get permits, prepare your home, build, inspect, and close out. Finish each phase before you start the next.
The short version of your step by step home renovation checklist is below. Each phase has a few tick boxes. The sections after it explain every step with real numbers.
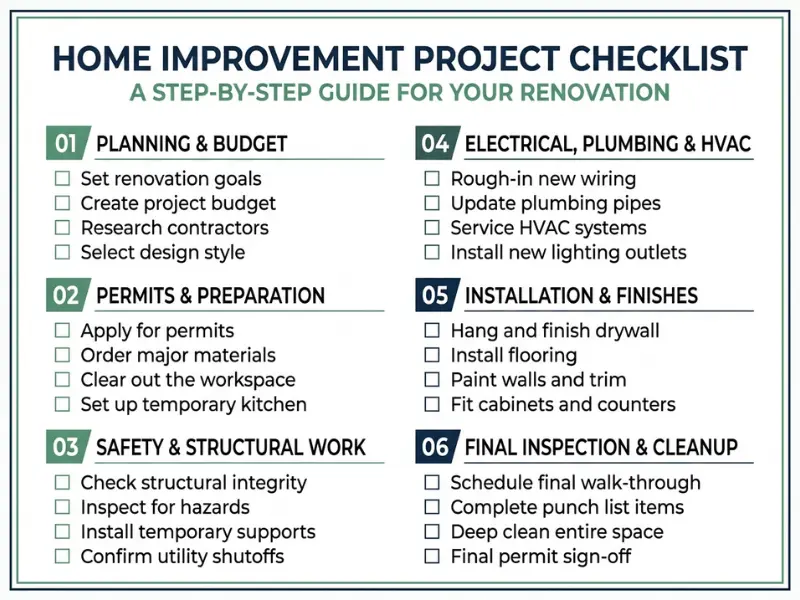
Phase 1: Plan and budget
Start here, before you call anyone.
- Write your goals and must-have list
- Measure every room you plan to change
- Get written quotes and set your budget
- Add a 10 to 20 percent cushion for surprises
Phase 2: Hire and get permits
Now you build your team.
- Check each contractor’s license, insurance, and references
- Compare at least three bids line by line
- Sign a written contract with a payment schedule
- Apply for permits and wait for approval
Phase 3: Prepare your home
Get the house ready before the first hammer swings.
- Take before photos and videos
- Clear and cover the work area
- Set up a temporary kitchen or bathroom
- Order long-wait items like cabinets and windows
Phase 4: Build, in the right order
Remember the order with one rule: messy work first, dust-sensitive work last.
Think about it this way. If you hang drywall before the plumber checks the pipes, you may have to cut it open again.
- Finish demolition and structural work
- Complete framing, then run pipes and wires inside the walls
- Hang drywall, then paint
- Install cabinets and fixtures, then flooring and trim
Phase 5: Inspect and fix problems
Check the work before the walls close, and again at the end.
- Book inspections before drywall covers pipes and wires
- Put every change in writing
- Photograph each stage with the date
- Fix any failed inspection item right away
Phase 6: Final walkthrough and close-out
Don’t pay the last bill until the crew truly finishes the job.
- Walk every room and write a punch list of small fixes
- Pass the final inspection and close your permit
- Hold back part of the final payment until the crew finishes the list
- Collect warranties, manuals, and final paperwork
In practice, a skipped step in Phase 1 or 2 usually shows up as a bill in Phase 4. So the real work starts with your plan.
How Do You Plan a Home Renovation Before Spending Anything?
Write down why you’re renovating, split your wants into must-haves and wish-list items, and plan one room at a time. Do all of this before you talk to a contractor.
A good plan costs you time, not money. It also protects you from the biggest budget drain: changing your mind after work starts.
Write a must-have list and a wish list
Start with your reason. Are you fixing a leak, gaining space, or getting ready to sell? Your answer shapes every other choice.
Then make two lists. A must-have fixes a real problem or meets a real need. A wish-list item is nice, but you can live without it.
In a kitchen redo, cabinets that are falling apart are a must-have. A fancy range hood is a wish.
Save design inspiration from magazines or Pinterest, too, so your contractor sees what you mean.
Try this simple test. Cross one item off your list and ask: is the project still worth doing? If yes, that item belongs on your wish list.
Plan room by room
One room is easier to price, schedule, and live around than a whole house. Write down four things for each room:
- What changes: floors, walls, layout, or fixtures
- Size: length, width, and ceiling height
- Choices made: tile, paint, and fixtures you’ve picked
- Open questions: anything you haven’t decided yet
Which room goes first? Fix problems first, like leaks or bad wiring. Then tackle the rooms you use every day. Looks come last.
If you live in the house, finish one room before you start the next. That way you always have a working kitchen or bathroom.
Decide what to DIY and what to hire out
Use this rule: if a mistake could cause a fire, a flood, or a collapse, hire a licensed pro.
Good jobs to DIY:
- Painting and caulking
- Hanging shelves and swapping cabinet handles
- Laying simple flooring that clicks together
Jobs to hire out:
- Electrical panels and wiring
- Plumbing inside walls
- Gas lines
- Walls that hold up your house
Many cities require a licensed electrician or plumber for this work, so check your local rules. And remember, a wrong DIY fix costs you twice: once for your materials, and again for the pro who redoes it.
Check your home’s age and hidden risks
Old houses can hide old materials. The US banned lead paint in homes in 1978, so a house built before then may have it. Homes built before the 1980s may also have asbestos in old floor tiles, insulation, or ceiling texture.
Federal rules also say contractors who disturb paint in pre-1978 homes must be EPA lead-safe certified. Do these checks before you lock in a budget:
- Find your home’s build year on your deed or tax record
- Ask each contractor if they hold EPA lead-safe certification
- Test suspect paint and materials before demolition
- Keep kids and pets away from dust and debris
Finding lead or asbestos doesn’t end your project. It means testing first and hiring a certified pro to handle it. A positive test changes your budget and your schedule, and you want to know that on day one, not day ten.
Once you finish your lists and home check, you can put real dollars next to each line.
How Much Should You Budget for a Home Renovation?
Build your budget from written quotes, then add 10 to 20 percent for surprises. Go toward the high end if your home is old or your plan moves walls or plumbing.
Costs swing by room, city, and finish level. Below you’ll find real ranges, a clear rule for your cushion, and the costs most people forget.
Typical cost ranges by room (kitchen, bathroom, whole house)
These are recent national averages from Angi-based cost guides. Use them to check that your plan is in the right zone, not as a final price.
- Kitchen: about $27,000 on average, with most projects between $14,600 and $41,600
- Bathroom: about $12,000 on average, with most between $6,600 and $18,000
- Whole house: $15 to $150 per square foot, depending on how much you change
- Whole house example: a 1,250 to 1,600 square foot home averages about $52,000
The kitchen numbers come from Angi’s 2026 data on 13,100 projects. The whole-house numbers come from This Old House, using Angi and NerdWallet data. Full gut jobs with structural changes cost much more.
Where you live matters a lot. Block Renovation, using city permit data, found that kitchen remodels in Oakland, California cost about 43 percent more than the national average.
How much extra to set aside, and when to go higher
Guides give a wide range, from 10 to 30 percent. That’s not much help. A simple rule works better, and it depends on how much can hide behind your walls:
- 10 percent: cosmetic work in a newer home, like paint and flooring
- 15 percent: kitchen or bathroom remodels
- 20 percent or more: older homes, moved walls, or moved plumbing
In practice, this money goes to things you can’t see yet, like rot, old wiring, and bad pipes.
On a $30,000 kitchen, 15 percent means $4,500 aside, so you plan for $34,500. Pros call this cushion a contingency reserve. Keep it in its own pot, and don’t spend it on a fancier faucet.
Costs people forget (permits, dumpster, storage, eating out, temporary living)
Many budgets list cabinets and tile but skip the costs around the job.
- Permit fees and plan drawings
- Dumpster or junk removal
- Storage for your furniture
- Takeout while your kitchen is out of use
- Hotel or rental if you move out
- Extra cleaning after the dust settles
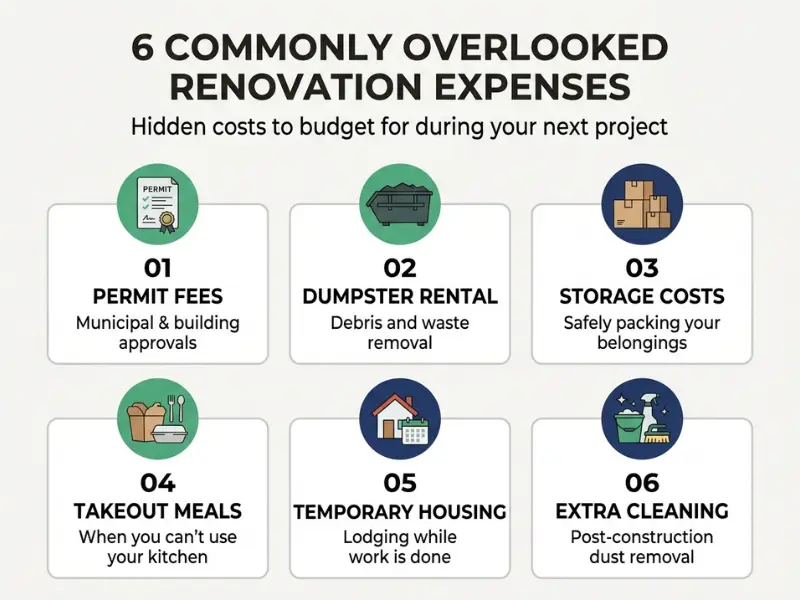
Takeout adds up fast. At $40 extra a day over six weeks, that’s $1,680 you never planned for. Give each of these its own line in your budget sheet.
How people pay for renovations (cash, home equity, loans)
Decide how you’ll pay before demolition starts, not after the first surprise bill.
- Cash savings: no interest and no new debt
- Home equity loan or line of credit: your home backs the loan
- Personal loan: no collateral, so compare the interest rate carefully
- Contractor financing: ask for every term in writing
This is general information, not financial advice. Talk to your bank before you borrow.
Why you need three written quotes
Quotes turn guesses into real numbers. They also show you if your budget fits your plan.
- Give every contractor the same plans and measurements
- Ask for each quote in writing, with materials listed
- Compare line items, not just the bottom number
- Ask why any quote is far lower or higher than the rest
A quote that’s much lower than the others often leaves something out. With real numbers in hand, you’re ready to find the people who’ll do the work.
How Do You Hire a Contractor and Compare Bids?
Get at least three written bids for the same job, check each contractor’s license, insurance, and references, then compare the bids line by line. The cheapest bid is rarely the best one.
The right contractor matters more than any tile or paint color you’ll pick. You’ll learn how to find, check, and compare your options, and how to sign a contract that protects you.
Where to find good contractors
Start with people who’ve done a job like yours.
- Neighbors and friends who finished a similar project
- Staff at local tile, lumber, or cabinet shops
- Online reviews, including the bad ones
- Your local Better Business Bureau and chamber of commerce listings
Suppliers are a smart source too. Their staff often know which crews show up on time and pay their bills. Interview at least three, and ask to see a finished job like yours.
What to check: license, insurance, references
Follow these four steps for every contractor on your list:
- Look up the license on your state licensing board’s website. It takes a few minutes.
- Ask for proof of insurance, then call the insurance company to confirm it’s active.
- Call three recent customers. Ask if the job finished on time, if the price changed, and if they’d hire the contractor again.
- Ask how long they’ve been in business and how many jobs like yours they’ve done.
Pay special attention to workers’ compensation insurance. If an uninsured worker gets hurt at your home, you could end up paying the bills.
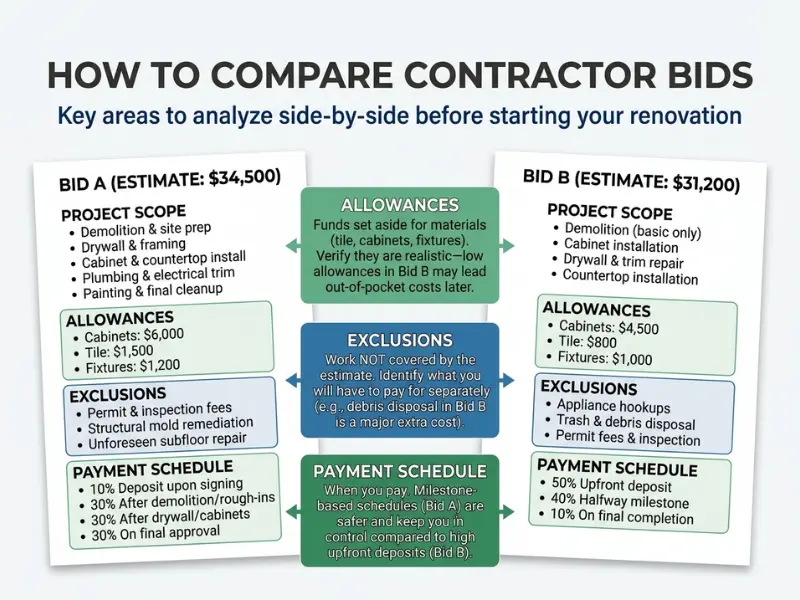
How to compare bids line by line (allowances, exclusions, who manages subcontractors)
Give every contractor the same plans, measurements, and wish list. Then compare these items:
- Allowances: a set dollar amount for things you haven’t picked yet, like tile or faucets
- Exclusions: work the bid leaves out, like permits, haul-away, or painting
- Subcontractors: who hires and manages the plumber and electrician
- Dates: when work starts and when it ends
A low bid can fool you. Bid A costs $29,500 with a $500 tile allowance, and Bid B costs $31,000 with a $2,500 allowance. Pick $2,500 tile and Bid A jumps to $31,500, so Bid B was cheaper all along.
What your contract must say (scope, payment schedule, change orders, timeline, warranty)
The truth is, if it isn’t in writing, it doesn’t exist. Your contract should list:
- Scope: exactly what work the crew does, with materials and brands
- Price and a payment schedule tied to finished stages
- Start date and finish date
- Change orders: every change in writing, signed, with the cost and time it adds
- Warranty: how long it lasts and what it covers
- Permits: who applies for them and who pays
Deposits, lien waivers, and red flags
Some states cap the deposit. California caps it at 10 percent or $1,000, whichever is less, and Maryland caps the payment at signing at one-third of the price. Check your state’s licensing board for your rule.
Then follow one rule: pay for progress, not promises. Split the price into four to six payments. Tie each one to a finished stage, like demolition done, inspection passed, or cabinets installed.
Now the lien waiver. It’s a signed note saying a contractor or supplier received payment and won’t claim your home for that money.
If your contractor skips paying a supplier, that supplier may be able to put a lien on your home, even though you already paid the contractor. Rules vary by state, so ask for a waiver with each payment.
Walk away if you see any of these red flags:
- Asks for a big payment up front, or cash only
- Pushes you to sign today
- Can’t show a license or proof of insurance
- Gives a bid far lower than the rest
- Won’t put the deal in writing
- Asks you to pull the permits in your name
One more office will matter before the crew starts: your city’s building department.
Do You Need a Permit to Renovate Your House?
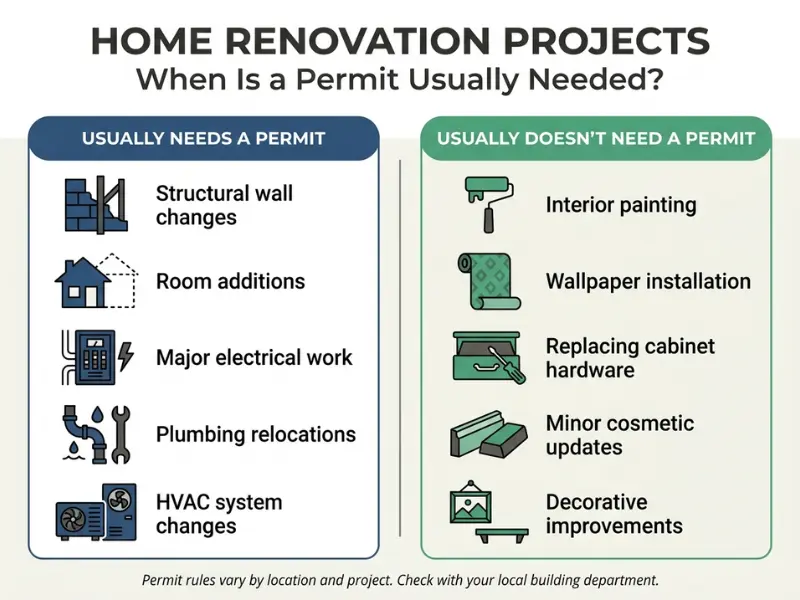
Usually yes for structural, electrical, and plumbing work. Paint and simple flooring usually don’t need one. Your local building department makes the final call.
Permit rules change from city to city, so call before you plan. Below you’ll see which jobs usually need one, how the process works, and what happens if you skip it.
Which projects usually need a permit
Usually need a permit:
- Moving or removing walls that hold up the house
- Adding or moving plumbing
- New electrical circuits or a panel upgrade
- Changing the size of a window or door opening
- Room additions
Usually don’t need one:
- Painting
- New flooring
- Replacing cabinets in the same spot
- Swapping a faucet or light fixture
Some cities also want permits for water heaters and window replacements. Additions and new bathrooms may need zoning review, too.
How to apply and how long it takes
Follow these steps:
- Find your building department’s website, or call them.
- Ask which permits your project needs.
- Submit your application and plans, and pay the fee.
- Wait for approval before work starts.
Timing swings a lot. Oakland, California says it can review a kitchen or bath remodel with no wall changes in 1 to 7 days if the application is correct.
In Shoreline, Washington, additions and remodels took about 18 weeks on average from application to approval for permits filed in 2023. Your city will differ, so ask for today’s wait time.
Treat approval as your start date. Don’t book crews or order materials until you know when it will land. A late permit can leave a booked crew waiting, and a crew that leaves for another job may not come back for weeks.
Who pulls the permit, you or your contractor
Usually your contractor pulls it. Put that in the contract. If you pull it yourself as the homeowner, you may carry the responsibility for the work meeting code.
Ask for a copy of the permit before work starts, and keep it in your project file.
What can happen if you skip permits
- Stop-work orders and fines
- Extra inspections, which can mean opening finished walls
- Trouble when you sell your home
- Insurance companies may deny claims for unpermitted work
Say you finish a basement with new wiring and no permit. Years later, a buyer’s inspector spots it. You may have to open walls, pay fees, or lower your price.
While you wait for approval, you can start getting the house ready.
How Do You Get Your House Ready Before Work Starts?
Take before photos, clear and cover the work area, plan where you’ll cook and wash, and order long-wait items first. Do all of it before demolition day.
Good prep is a list of small jobs, not one big day. Work through these jobs in order so the crew can start and keep moving.
Take before photos and videos
Photos protect you if something breaks. They also help with insurance claims.
- Wide shots of every room from each corner
- Close-ups of floors, walls, and ceilings
- A slow video walk-through where you talk out loud
- Any cracks, stains, or damage that already exist
Save a copy online, so a lost phone doesn’t erase your proof.
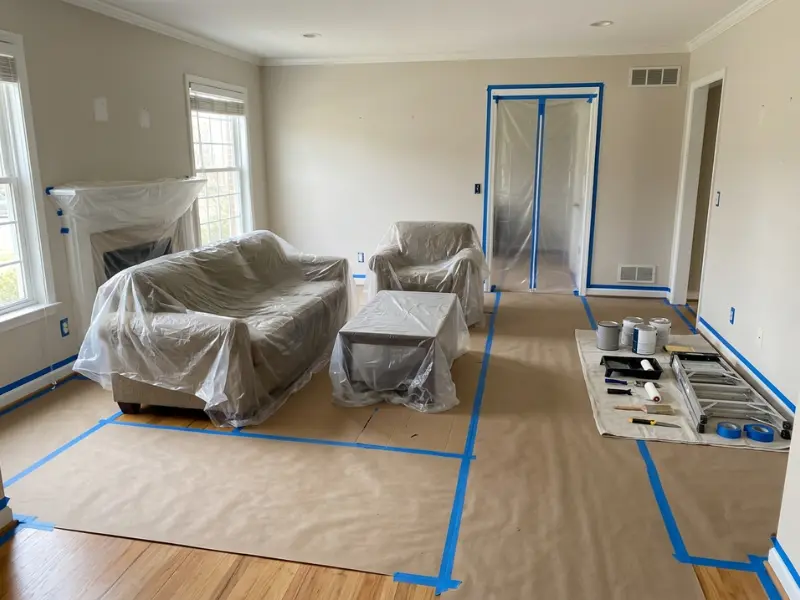
Move, cover and protect your belongings and floors
Dust gets into everything, so cover more than you think.
- Move fragile and valuable items out of the work area
- Cover furniture you can’t move with plastic sheeting
- Protect floors with floor protection board, not just thin drop cloths
- Seal doorways with plastic sheeting and tape
- Cover air vents so dust stays out of your ducts
- Clear halls and entry paths for workers carrying materials
Plan where you’ll live, cook and wash (temporary kitchen or bath)
If your kitchen closes, set up a mini kitchen in another room. A microwave, a coffee maker, a small fridge, paper plates, and a dish tub will carry you through.
- Wash dishes in a bathroom sink or a dish tub
- Spread appliances across different outlets so you don’t trip a breaker
- If you have only one bathroom, plan another place to shower
- For a full-house job, book a rental or a stay with family
Live in your temporary setup for one weekend before demolition. You’ll spot what’s missing while your real kitchen still works.
Order long-wait items early (cabinets, windows, appliances)
Here is the thing. Many remodel delays come from late deliveries, not slow crews. Cabinets alone can take 2 to 16 weeks.
Lead times change by brand and year, but remodeling companies report ranges like these:
- Stock cabinets: about 2 to 3 weeks
- Semi-custom and custom cabinets: often 6 to 16 weeks
- Special appliances: 8 to 16 weeks for some models
- Custom exterior doors: 10 to 16 weeks
Custom-size windows usually take longer than stock sizes. Ask each supplier for a delivery date in writing, and order before demolition. If your cabinets have no date, your kitchen can sit torn up for weeks.
Check every box when it arrives. A wrong or damaged cabinet found late can cost you weeks.
Set work rules: hours, access, lockbox, pets, dust barriers, neighbor heads-up
Agree on the ground rules before day one.
- Hours: set start and stop times, and check your city’s noise rules
- Access: a lockbox lets crews start early without waking you
- Space: pick a spot for the dumpster, materials, and parking
- Bathroom: tell the crew which one they can use
- Pets and kids: keep both out of the work zone
- Dust: keep barriers sealed and doors closed
- Neighbors: share the dates, the noise, and your phone number
Call 811 before any digging outside
If your project involves digging, like a deck, a fence, or a new gas line, call 811 first. It’s free. Call at least two to three business days ahead, depending on your state.
Utility crews then mark buried lines with paint or flags. Even if your contractor says they’ll call, ask who’s doing it and get the ticket number.
With the house ready and the materials on the way, the next question is what the crew does first.
What Order Should You Renovate a House In?
Start with demolition and structure, then framing and windows, rough-in plumbing and electrical, inspection, insulation and drywall, paint, cabinets and fixtures, flooring, and trim. Messy work goes first. Dust-sensitive work goes last.
Each step sets up the next one. Swap them and you pay twice, once to do the work and once to redo it. The steps below show each one and the reason for its spot.
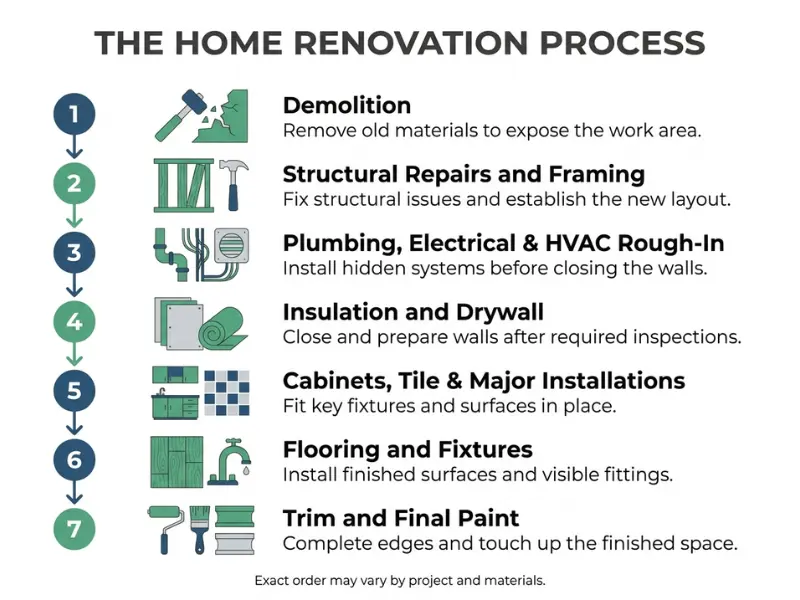
Demolition and structural changes
Tear out what’s leaving first: old cabinets, fixtures, flooring, and walls. Then handle structural work, like moving a wall that holds up the house, adding beams, or fixing the foundation.
Everything else sits on this base. You can’t build on a frame that’s still changing.
Framing and windows
Crews frame new walls and cut the openings for doors and windows. Then the windows and exterior doors go in.
That seals your house from rain and wind before interior work starts. It also fixes exactly where pipes and wires will run.
Rough-in: plumbing, electrical, HVAC
Rough-in means the pipes, wires, and ducts that live inside your walls. They go in while the walls are still open.
In practice, plumbing often goes first. Pipes need the most room and are the hardest to move later. Electrical and HVAC follow.
Open walls are your cheapest chance to add things. Decide these before the walls close:
- Extra outlets and switches where you’ll really use them
- Wood blocking behind walls for a future TV mount or grab bar
- Pipe or wire for a future bathroom, sink, or appliance
- Better insulation while you have easy access
Block Renovation, a renovation company, says a bid to add a sink line after the walls close can start around $3,000.
Inspection, then insulation and drywall
Before any wall closes, an inspector checks the rough-in work. If it fails, the crew fixes it and the inspector comes back. Insulation goes in only after rough-in passes.
Then the drywall goes up. Crews hang it, tape the seams, add joint compound (pros call it mud), and sand it smooth. The mud needs time to dry. Rush it, and the seams can show through your paint later.
Paint, cabinets and fixtures
Primer and the first coat of paint go on before cabinets and floors, so drips can’t hurt them. Cabinets come next, then countertops.
Finish plumbing and electrical come after that. That means faucets, outlets, switches, light fixtures, and appliances.
Flooring, trim and final details
Pros disagree on floors and cabinets. Some lay flooring first so it runs wall to wall. Others set cabinets first and fit the floor around them. Ask your contractor which plan they use, and write it into the schedule.
Baseboards and trim go in after the floors. The last paint touch-ups wait until every trade finishes, because every trade nicks the walls. Keep a small can of paint for later.
Why this order saves money (what happens when you swap steps)
Three common swaps show the cost:
- Drywall before the rough-in inspection: crews cut the walls open again
- Floors before paint: drips and scratches mean repairs or refinishing
- Cabinets before final plumbing and wiring: moving a sink means pulling cabinets out
Remodelers call changing pipes or wires after drywall goes up one of the most expensive homeowner mistakes. Also, don’t squeeze two trades into one small room at the same time. They slow each other down and create safety problems.
Before work starts, ask your contractor to explain their order. A clear, confident answer tells you a lot. Order tells you what happens when. The next question is how long all of it takes.
How Long Does a Home Renovation Take?
A bathroom often takes 4 to 6 weeks, and a kitchen 6 to 16 weeks, depending on the layout. A whole house takes about 4 to 6 months. Planning, permits, and deliveries add time before work starts.
Your renovation timeline depends on size, surprises, and how fast you decide. Below you’ll find typical ranges, the biggest causes of delay, and how to build in a buffer.
Typical timelines by project size
These ranges come from remodeling company guides and count building time only:
- Cosmetic bathroom refresh: a few days to 3 weeks
- Full bathroom remodel: 4 to 6 weeks, up to 10 for large or custom jobs
- Kitchen with the same layout: 6 to 10 weeks
- Kitchen with a new layout: 10 to 16 weeks
- Whole house: 16 to 24 weeks, or about 4 to 6 months
Add about 4 to 8 weeks of planning before work starts, plus your permit wait. The calendar starts when you start planning, not on demolition day.
What causes the biggest delays
Most delays trace back to a step on your checklist:
- Permit waits (Phase 2)
- Late cabinet, appliance, or door deliveries (Phase 3)
- Failed inspections that stop work until the fix passes (Phase 5)
- Surprises behind the walls
- Gaps between trades, like a plumber who’s booked elsewhere
- Slow decisions on tile, paint, or fixtures
One delay catches many homeowners off guard. Countertop makers usually can’t measure until the cabinets are in. Then they often take 2 to 3 weeks to make and install, and you have no sink the whole time.
How to add a time buffer (10 to 15 percent is a common starting point)
Start with 10 to 15 percent extra time. Go higher for old homes and custom orders. A 12 week kitchen with a 15 percent buffer becomes about 14 weeks.
Don’t set a hard deadline you can’t miss. If you want your new kitchen for the holidays, count backward from that day and start months earlier.
Overlap your waits, too. Once your design is final and you know roughly when your permit will land, order long-wait items. That way the two longest waits run side by side.
Even a good schedule can break when a wall opens up and shows something nobody expected.
What Do You Do When You Find Problems After Demolition?
Stop work in that area, take photos, get the fix and its cost in a written change order, and check your cushion before you say yes.
Surprises are normal. Water damage, mold, and pests are common finds when crews open walls or floors.
Common surprises: mold, old wiring, rot, pests, uneven framing
Walls and floors hide a lot. Crews find these most often:
- Mold: grows behind walls where moisture hides
- Old wiring: outdated or unsafe wires from past work or older homes
- Rot: soft wood from slow leaks under floors or around tubs
- Pests: termite or ant damage inside the framing
- Uneven framing: floors or walls that aren’t level, which hurts tile and cabinets
- Asbestos or lead paint: more likely in older homes
Say you pull out an old tub and find soft, rotted floor boards. That’s a leak that’s been running for years.
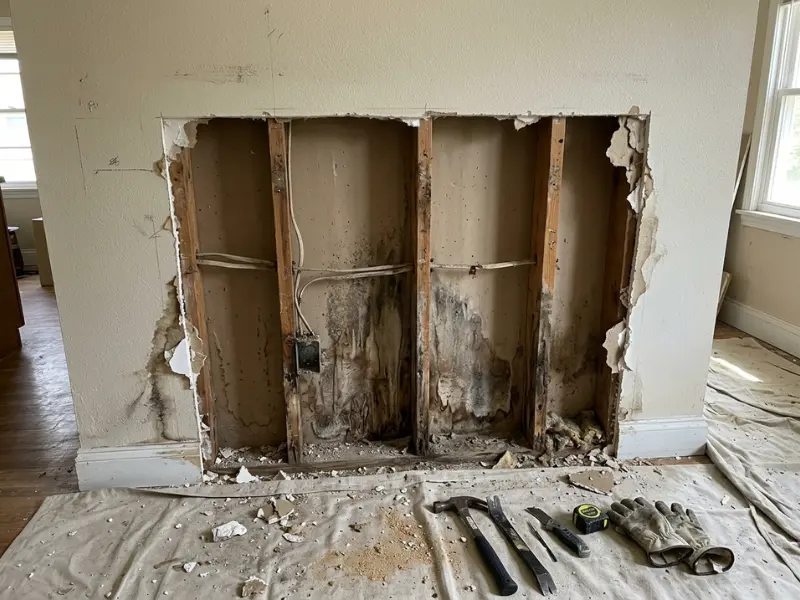
The first four moves when you find one
Follow these steps, in this order:
- Stop work in that area, and don’t let anyone cover it up. If you think it’s asbestos, leave the area and keep everyone out.
- Get proof. Take dated photos and ask your contractor to show you the problem in person.
- Get a written change order. It should name the problem, the fix, the exact price, and the added time.
- Check your cushion. Pay for the fix from your reserve first, then trade it against wish-list items.
If it isn’t a safety risk, give yourself 24 hours to get a second opinion. Never approve a vague “we’ll figure it out” price.
Who pays, and how to protect your budget
In most contracts, you pay for true surprises. That’s what your contingency reserve is for. If your contractor should have seen the problem before work began, like a water stain on a ceiling, ask why it wasn’t in the bid.
- Read the contract’s clause on unforeseen conditions before you sign
- Ask for hourly rates and markup on extra work up front
Don’t pay for extra work ahead of your payment schedule, even when the problem is real.
When to bring in an independent inspector
Bring one in when a problem affects structure, safety, or costs thousands to fix. Pick someone who doesn’t profit from the repair: a licensed home inspector, a structural engineer, or a certified mold inspector. Pay them yourself, so they work for you.
A $6,000 quote to fix a sagging beam is a good moment for a second opinion. An engineer’s visit costs a fraction of that, and tells you what the fix really needs.
Surprises are easier to handle when you already have a steady routine for checking on the work.
How Do You Keep a Renovation on Track While Work Is Happening?
Hold a short weekly check-in, put every change in writing, take dated photos, and book inspections before walls close. Small habits like these stop small problems from growing.
You don’t need to watch the crew all day. A steady weekly routine does the job.
Weekly check-ins that actually work
What actually works is one fixed day and time each week, kept to 15 or 20 minutes. Walk the site together. Then ask the same four questions:
- What did the crew finish this week?
- What happens next week?
- What decisions do you need from me, and by when?
- Has anything changed in the schedule or the price?
Send a two-line recap by text or email afterward, so everyone remembers the same thing.
Keep a decision list with a “decide by” date for each choice. Count back from each item’s delivery time. And follow this rule: if one choice depends on another, settle both before you order.
Say you haven’t picked a faucet yet. The countertop maker needs the hole count to cut the stone. Pick the faucet first.
Keep every change in writing
You already know big surprises need a change order. Small changes need one too. Moving an outlet or swapping tile feels minor, but ten of them add up. Pros call this scope creep.
Before you approve any change, ask three questions: What does it cost? How many days does it add? What does it replace?
Keep a running change log with a total at the bottom. It shows you how much of your cushion is already gone. Moving one kitchen outlet might cost $150 and one day. Ten changes like that cost $1,500 and ten days.
Inspections to book before walls close (framing, rough-in, final)
Never let a crew cover work before the inspector signs off. The stops you get depend on your job and your city. Most remodels face some of these:
- Framing: after walls or beams change
- Rough-in: plumbing, electrical, and HVAC, before insulation
- Insulation: before drywall goes up
- Drywall: in some cities, before taping
- Final: after the crew finishes all permitted work
Your contractor usually books them. Ask for the dates, and ask to see the signed inspection record afterward. A failed inspection with a fix list means the system is working, so don’t panic.
Track progress with dated photos
Take photos once a week from the same spots. Also photograph inside the walls before they close: every pipe, wire, and beam.
Add a note on how far each one sits from a fixed point, like a corner or a door. Years from now, you’ll know where not to drill.
Save everything in a shared folder named by date and room. You can also match each photo set to a payment stage, and pay only when the photos match the work.
When the crew paints the last wall and starts packing up, one job remains.
What Is a Punch List and How Do You Close Out the Job?
A punch list is your final list of small fixes. Walk every room, write each issue with its exact spot, and hold back part of the final payment until the crew finishes everything.
The job isn’t finished when the crew says it is. It’s finished when you’ve cleared your list, closed your permit, and collected your paperwork.
How to walk each room and write a useful punch list (good vs vague examples)
Punch list items are small: a paint drip, a door that rubs, a missing outlet cover. Walk the house with your contractor and follow these steps:
- Pick a time in daylight, and turn on every light.
- Go room by room, in the same order each time.
- Test everything that moves, turns, or plugs in, and run the water to check under sinks for drips.
- Hold a flashlight sideways along walls and ceilings. Bumps and seams jump out.
- Compare finishes to your contract: the right tile, fixtures, and paint color.
- Mark each spot with painter’s tape, take a photo, and write it down.
Make each item specific:
- Vague: “Fix kitchen cabinets”
- Useful: “Kitchen, left of the stove: door 3 rubs the frame, adjust the hinge”
- Vague: “Paint touch-ups”
- Useful: “Hall, east wall, 3 feet up: scuff near the light switch”
Don’t sign the list as final until you’ve tested everything. Problems found later turn into arguments.
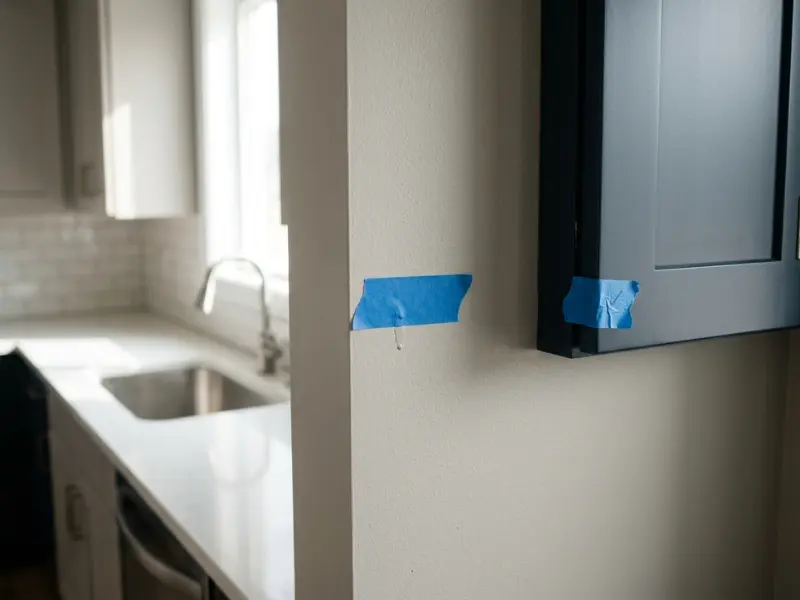
Final inspection and closing out the permit
The final inspection is the inspector’s last check that the crew finished all permitted work and that it meets code. Your contractor usually books it. If it fails, they fix the items and the inspector returns.
Then comes the step people forget: close the permit. Ask for the signed final record and keep it. An open permit can surface when you sell, and a buyer’s agent or title company may search for one.
Waiting also has a price. Many cities let a permit expire if work stops for about 180 days. An expired permit may mean a new one that meets current building codes.
Final payment: holdback, lien waivers, warranties and manuals
Hold back part of the final payment until the crew finishes the punch list. Many contracts hold back 5 to 10 percent. A smarter rule: hold back 1.5 to 2 times the cost of the unfinished items.
On a $30,000 job with $400 of unfinished work, you hold back $600 to $800 and pay the rest. Neither side gets stuck over a back-ordered towel bar.
Write this in your contract before work starts. Some states set rules on holdbacks, so check yours.
Before the last check, collect:
- Final lien waivers from your contractor and any big subcontractors and suppliers
- The contractor’s written workmanship warranty
- Product warranties and manuals for appliances, windows, and fixtures
- Paint colors and brands, so touch-ups match later
- Contact info for every subcontractor
Put all of it in one folder with your permit record, inspection records, and wall photos. That’s your closeout file.
Deep clean and final touches
Most crews do a rough clean, not a deep one. Fine dust keeps settling for days, so clean again after the crew leaves and once more a week later.
- Replace your HVAC filter and wipe the vents
- Wipe inside cabinets and drawers
- Peel protective film off appliances and fixtures
- Check each new surface’s care guide before you pick a cleaner
Then photograph the finished rooms from the same spots as your before photos. Finally, call your insurance agent. Your home may now cost more to rebuild, so your coverage limit may be too low.
That’s the whole path, from your first goal to your final signature. A few questions come up again and again, so the quick answers are below.
Frequently Asked Questions
What is the first thing to do when renovating a house?
Decide your goals and must-haves, then set a budget from written quotes. If you just bought the house, hire a home inspector first, so you know about hidden problems before you plan. A home renovation checklist then helps you put every step in order, from permits to final cleanup.
What are the 5 stages of home renovation?
Most guides use five stages: planning, design and permits, preparation, construction, and finishing. Planning sets your goals and budget. Design and permits lock in your drawings and approvals. Preparation covers ordering materials and clearing space. Construction runs from demolition to fixtures. Finishing covers inspection, the punch list, and cleaning.
What is the 30% rule in remodeling?
The 30% rule says you shouldn’t spend more than 30% of your home’s value on renovations. On a $400,000 home, that’s about $120,000. It’s a guideline, not a law. Use it as a ceiling, then check it against what buyers in your area actually pay for homes like yours.
What are the most common mistakes during home renovations?
The biggest mistakes are skipping a written contract, picking the lowest bid, changing plans after work starts, and spending every dollar with no cushion. Late cabinet orders also cause long delays. Each one costs money or weeks. A home renovation checklist and a 10 to 20 percent cushion help prevent most of them.
How should I prioritize renovation projects?
Fix safety and water problems first, then the rooms you use every day, then looks. A leaking roof or bad wiring comes before new countertops. Next, pick projects that cut bills, like insulation or efficient windows. Save style touches like decor and furniture for last, since they’re easy to add anytime.
What home renovations add the most value?
Exterior projects usually add the most value for the money. In the 2025 Cost vs. Value report, garage door replacement ranked first, returning about 268% of its cost, and a steel entry door came second at 216%. Upscale kitchen and bathroom remodels usually return less than they cost.
Can you live in your house during a renovation?
Yes, you can live in your house during many renovations, but expect dust, noise, and short water or power shutoffs. Single-room jobs and small projects work best. For a whole-house gut, or a job that closes your only kitchen and bathroom, plan to stay somewhere else for several weeks.
What is the difference between a renovation and a remodel?
A renovation brings an old space back to good shape, like repairing floors and repainting. A remodel changes what the space is, like moving walls or turning a bedroom into an office. Both can follow the same home remodel checklist, and permit offices care more about the work than the label.
Should I hire an architect for a home renovation?
Not always. Cosmetic jobs like paint, floors, and new fixtures don’t need an architect. Hire an architect or designer when you move walls, add rooms, or change the layout, since permit offices often want drawings for that work. Structural changes may also need an engineer. Ask your building department what drawings your project needs.
Should you renovate before or after you move in?
Renovate before you move in when you can. An empty house means no furniture to cover, faster work, and no dust in your daily life. If you can’t, do the big, messy jobs first, like floors and kitchens, and save small fixes for later. Mortgage payments usually start soon after closing, so a long delay gets expensive.
Conclusion
You don’t have to do everything today. You just have to do the next thing in the right order. A renovation is big, but each part has its own place in line.
Your home renovation checklist works because order saves money: plan first, hire carefully, get approvals, then build. Remember the simple rule behind it all: messy work first, dust-sensitive work last.
Set your renovation budget from written quotes, and keep 10 to 20 percent aside. Sign a contract that spells out the work, the payments, and every change. At the end, walk each room with a punch list before you pay the last bill.
So start small this week, with your home renovation checklist in hand. Write your must-have list and your wish list. Measure the rooms you plan to change.
Then ask three contractors for written quotes. Those three steps set up everything else. Try them, and the rest of the project will feel much calmer.