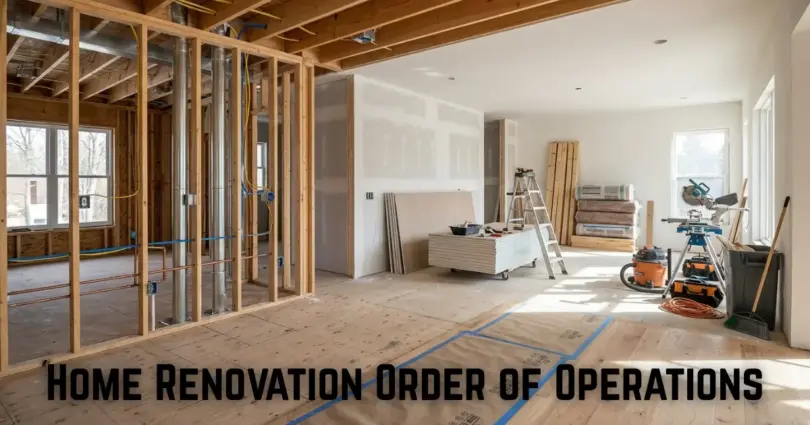

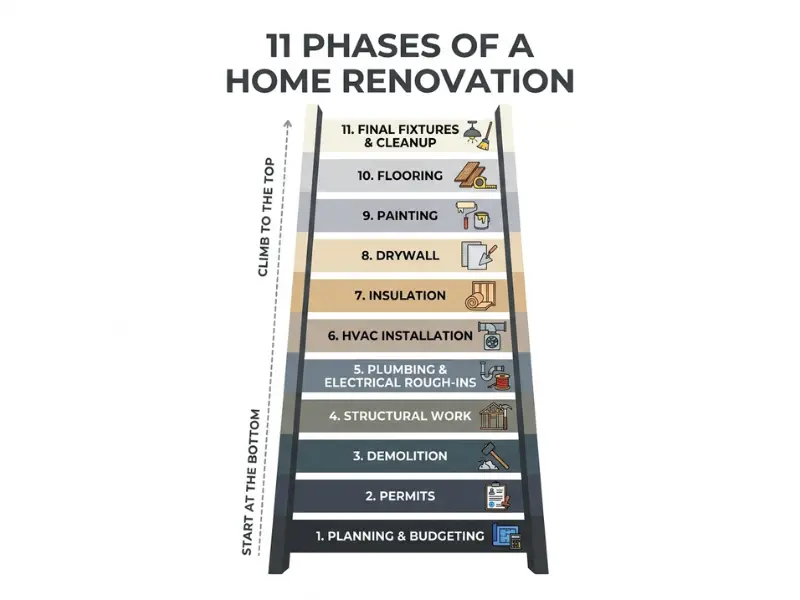
The home renovation order of operations is: plan and get permits, demolish, fix structure, frame, run plumbing, electrical and HVAC, pass rough inspection, insulate, hang drywall, install flooring and cabinets, add countertops, trim and paint, then fixtures and final cleanup. This order stops you from paying twice. Changing wires after drywall means cutting open finished walls and paying to patch them.
Here’s something odd. Read three contractor guides on renovation order, and they won’t agree on where the flooring goes. One puts floors before cabinets. Another puts them last. Both sound sure.
That’s the trouble with the guides we read on the home renovation order of operations. They list what comes next, but rarely say why. So when your contractor suggests something different, you can’t tell who’s right.
This guide fixes that. You’ll learn the full sequence, from permits to the final walkthrough, and the reason behind each step.
You’ll get a simple table that settles the flooring argument, a look at which inspections can stop your work, and a checklist you can print. Planning only a kitchen or bathroom? You’ll find a shorter order for those too.
Learn the home renovation order of operations once, and every quote, schedule, and contractor chat starts to make sense. Next, you’ll see the full sequence in one simple table.
What Is the Correct Order of a Home Renovation?
The correct order is: plan, demolish, fix the structure, run the systems, close the walls, then add floors, cabinets, paint, and fixtures. Messy work goes first. Pretty work goes last.
The table below shows the whole home renovation order of operations on one page. After it, you’ll see where to start if you renovate in stages, and which steps can run side by side.
The full sequence at a glance
| Phase | Who does it | Why it sits here | If you skip it |
| 1. Plan, budget, permits | You, designer, contractor | Every later step depends on the plan | Crews guess, and inspectors can stop work |
| 2. Testing and prep | Testers, contractor | Old homes can hold lead or asbestos | Hazard dust spreads through your house |
| 3. Demolition and hidden repairs | Demo crew | Open walls show the damage | Rot and leaks stay buried |
| 4. Framing, roof, windows | Carpenters | New walls and openings come first | Pipes and wires have nowhere to go |
| 5. Plumbing, electrical, HVAC rough-in | Licensed trades | The walls are still open | Crews cut into finished walls later |
| 6. Inspections | City inspector | The inspector must see inside the walls | You reopen closed walls to prove the work |
| 7. Insulation and drywall | Insulation and drywall crews | Walls close only after inspection | Gaps in insulation, or drywall torn out |
| 8. Flooring (timing varies) | Flooring crew | Heavy trades are mostly done | Crews scratch and dent new floors |
| 9. Cabinets and countertops | Cabinet and countertop crews | Floors and walls are ready | Crews cut countertops to the wrong size |
| 10. Trim and paint | Carpenters, painters | Dust has mostly settled | Wet paint catches dust and dries bumpy |
| 11. Fixtures, appliances, final inspection | Plumber, electrician, you | Delicate items go in last | Crews chip, splash, or paint over fixtures |
Which room or area goes first if you renovate in stages?
Start with anything that can damage the house: roof leaks, old wiring, and structure. Next, do the room with the most plumbing and wiring. Finish the rest after.
The guides we read skip one more point. If you plan to renovate over a year or two, do all the hidden work for the whole house first. That means rough wiring, pipes, and vents.
Then finish rooms one at a time. If you don’t, you close a wall in January and open it again in June.
Which steps can overlap, and which can never overlap?
Some work can share the same week. Other work has to wait.
Steps that can overlap:
- Framing in one room while rough-in starts in another
- Ordering materials while demolition runs
- Tile work in one room while drywall mud dries in another
Steps that should never overlap:
- Drywall before the rough-in inspection passes
- Finish paint while other trades still work in the room
- Countertop measuring before the cabinets sit in their final spot
Knowing the order is one thing. Seeing what happens when you ignore it is another.
Why Does the Order of a Renovation Matter?
Wrong order means you finish a surface, then break it open for the next trade. You pay twice for the same wall, floor, or tile.
Think about it this way. Every renovation has things you can see and things you can’t. The right order protects what you can see from work on what you can’t.
The redo chain: how one skipped step ruins three others
Say you tile a bathroom wall before the plumber finishes. Then you decide to move the shower valve. Now you pay for all of this:
- A crew breaks out the new tile.
- Another crew opens the wall behind it.
- The plumber moves the valve.
- Crews patch and waterproof the wall again.
- A tiler sets new tile.
You bought the tile once. You now pay for five jobs, and often a second batch of tile. One skipped step rarely costs one redo. It starts a chain, and every link has its own bill. Put the plumber first, and the chain never starts.

Why trades cannot all work at once
Each trade needs the last trade’s work finished, checked, and out of the way. Three limits make that true:
- Inspectors must see the work before walls close
- Drywall mud, paint, and grout need time to dry or cure
- Crews in the same space damage each other’s work
The good news is that most redo chains start before the first wall comes down, and so does the fix.
What Should You Do Before the Work Starts?
Before any wall comes down, set your scope and budget, get permits, test older homes for lead and asbestos, mark load-bearing walls, shut off utilities, and order slow items early.
Most of these jobs feel boring. The truth is they decide whether your project runs smooth or stalls in week three.
Set your scope and a budget with a contingency fund
Scope means a written list of what you will change and what you won’t. Write it room by room. Then every contractor quotes the same job, and you can compare prices fairly.
Add a contingency fund on top of your budget. Remodeling guides commonly suggest 10 to 20 percent, with the higher end for older homes.
On a $40,000 project, that’s $4,000 to $8,000 set aside. Keep it in a separate account so it doesn’t turn into tile money.
Get building permits first (and why rules change by city)
Permits usually cover structural, electrical, plumbing, and HVAC changes. Cosmetic work like paint often needs none. But rules change by city and county, so call your local building department before you plan.
In practice, your contractor often pulls the permit. Ask who does it, in writing. Work done without a permit can cause trouble when you sell your home or file an insurance claim.
Homes built before 1980: test for asbestos and lead
Older homes can hide asbestos in flooring, ceiling texture, and insulation. The US banned lead paint in homes in 1978, so older paint may contain it. Demolition turns both into dust.
So test before you demolish. Use a certified lab or inspector. Paid contractors working in older US homes must follow EPA lead-safe rules.
Test before you collect quotes, not after. A positive result changes the scope, the schedule, and the price. Quotes written before the test won’t hold.
Find load-bearing walls and pipe or wire paths
A load-bearing wall holds up the floor or roof above it. You can’t tell by looking. Ask your contractor or a structural engineer to mark each one before you plan any layout change.
Also find your main water shutoff, electrical panel, and gas shutoff. Know where the main pipes and wires run. Cutting into the wrong spot floods a room or kills the power.
Order slow items early (cabinets, windows, custom tile)
Some items take longer to arrive than to install. Lead times vary by maker. Typical ranges for cabinets look like this:
- Stock cabinets: days to a couple of weeks
- Semi-custom cabinets: about 4 to 6 weeks
- Custom cabinets: 6 to 16 weeks
Windows, appliances, and custom tile can take weeks too, so ask the seller for a delivery date before you set a start date. Order cabinets only after final measurements. A wrong cabinet can cost you a replacement and another long wait.
Count backward from your move-in date. If custom cabinets take 12 weeks, don’t tear out your kitchen until you place the order. Otherwise you live in a gutted kitchen and wait.
Plan where you will live and how you will block dust
Decide now whether you’ll stay or leave. Staying needs a plan: a temporary kitchen, one working bathroom, and clear walking paths.
Dust control starts before demolition. Ask your contractor how they’ll block it.
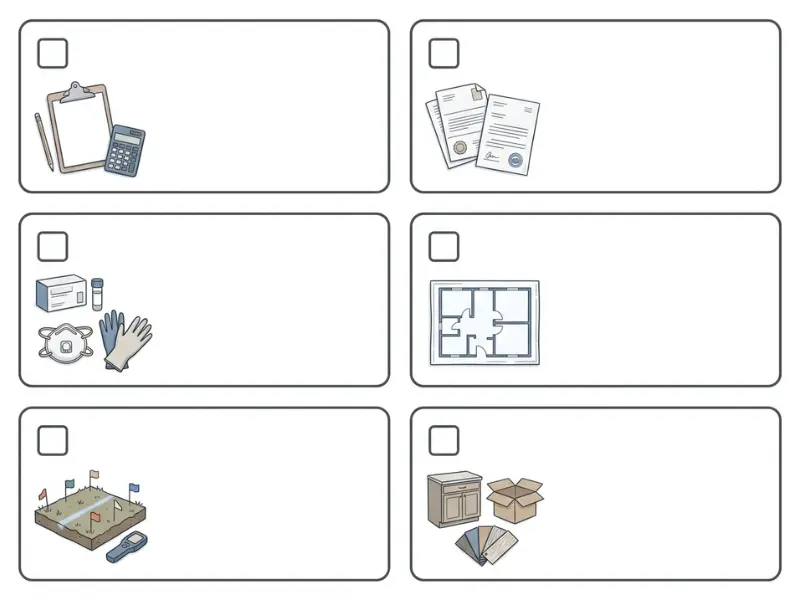
Once the paperwork, tests, and orders are done, the first real work begins: tearing out the old.
What Happens First: Demolition and Hidden Repairs?
Demolition removes old walls, floors, and fixtures. Once the walls are open, you check for rot, leaks, and damage. Fix each structural repair and leak before anything new goes in.
Demo looks like the easy part. It’s where your project’s real scope shows up.
Full gut vs partial demo
Partial demo removes only what your plan changes, like one wall, a kitchen, or old fixtures. A full gut strips the house down to its studs. Only the structure and exterior walls stay.
Your scope decides which one you need. Either way, crews haul out the debris and dispose of hazardous materials safely. They also cover the floors, doors, and vents in rooms that stay.
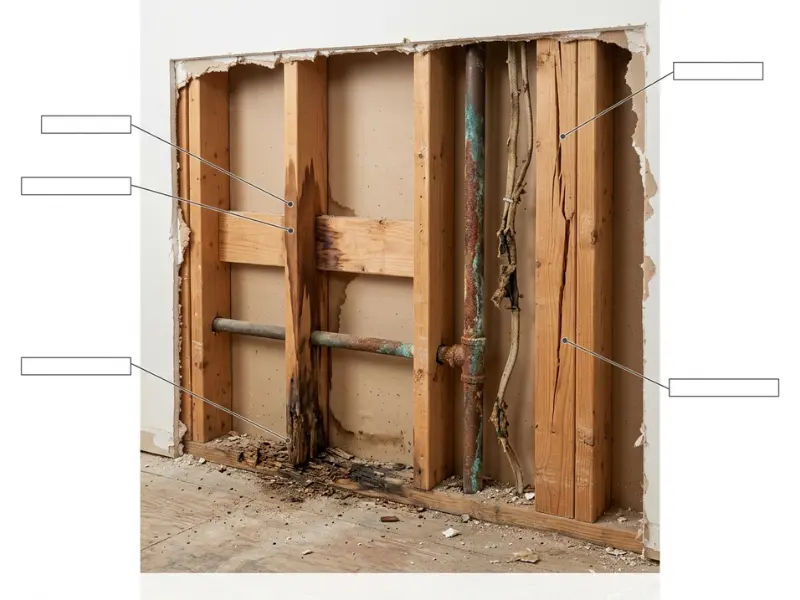
What contractors check once walls are open
Open walls tell the truth about your house. Crews look for:
- Rot in the framing, and a soft or missing subfloor
- Water stains and slow leaks
- Roof damage that lets water in
- Old wiring, such as knob-and-tube in very old homes
- Corroded old pipes, such as cast iron
- Framing that doesn’t meet today’s standards
Older homes hide more of these, which is why you set up a contingency fund before work starts.
What to do when you find a surprise
Stop work on that spot. Then follow these steps:
- Photograph the problem.
- Ask your contractor for fix options and a written price.
- Sign a change order before any extra work starts.
- Pay for the fix from your contingency fund.
- Fix it fully before new work covers it.
What actually works is photographing every open wall before it closes, even when nothing looks wrong. Years later, those photos show where pipes and wires run. They help when you sell, and when a future crew needs to cut in.
Once crews fix the damage and the space is bare, it’s time to give the house its new shape.
What Comes Next: Framing and Exterior Work?
Framing builds the new walls, door and window openings, and rooflines. Roof, windows, and siding go in before interior finishes, so rain and cutting don’t hurt new work.
Think of framing as the skeleton of your project. It sets the shape of every room before anything else touches it.
What framing includes
A small remodel might need three new walls. A big one might need a new roofline. Framing covers:
- New exterior and interior walls
- New door and window openings
- Rooflines
- Knee walls (short walls, often under a sloped roof)
- Built-in nooks and details
Why windows, doors, and roof go in before interior finishes
Rain ruins finished work. Water on new drywall, floors, or cabinets means replacing them. A closed-in roof, plus windows and doors, keeps weather out so the inside crews work dry.
Picture new hardwood in a room with no window yet. One storm can warp the boards. Cutting new window openings also makes dust and debris, and window changes often mean changes to the interior trim. Do it first, then trim once.
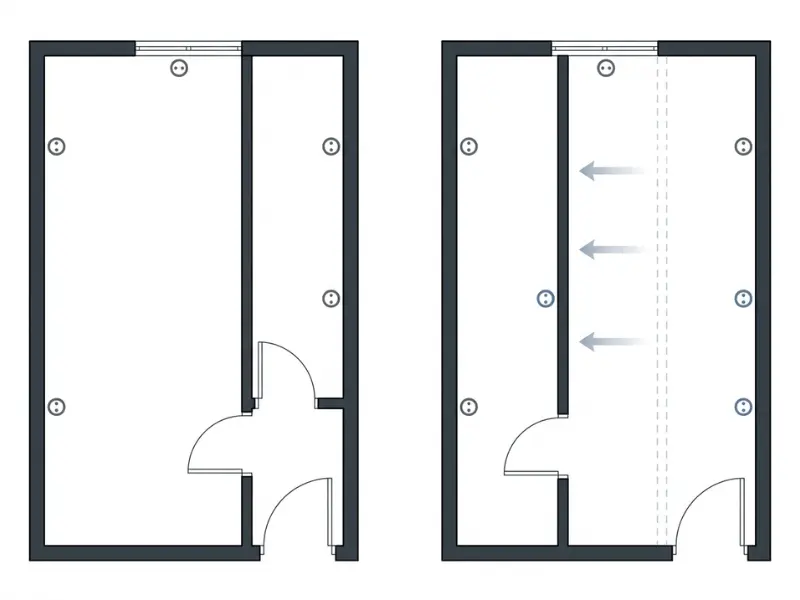
Last chance to change the layout cheaply
Right now, moving an outlet or adding a door costs little. After drywall, it costs a lot.
Walk through the framed rooms with your furniture plan in hand. Check these before the walls close:
- Blocking (extra wood between studs) for TV mounts, grab bars, and heavy shelves
- Extra outlets where you’ll really use them
- Door swings and pocket door space
- Light switch spots right at the doorway
Many crews offer a walkthrough at this stage. If yours doesn’t, ask for one.
Once the walls have a frame, the systems that make a house work move in. And they arrive in a set order.
What Order Do Plumbing, Electrical, and HVAC Go In?
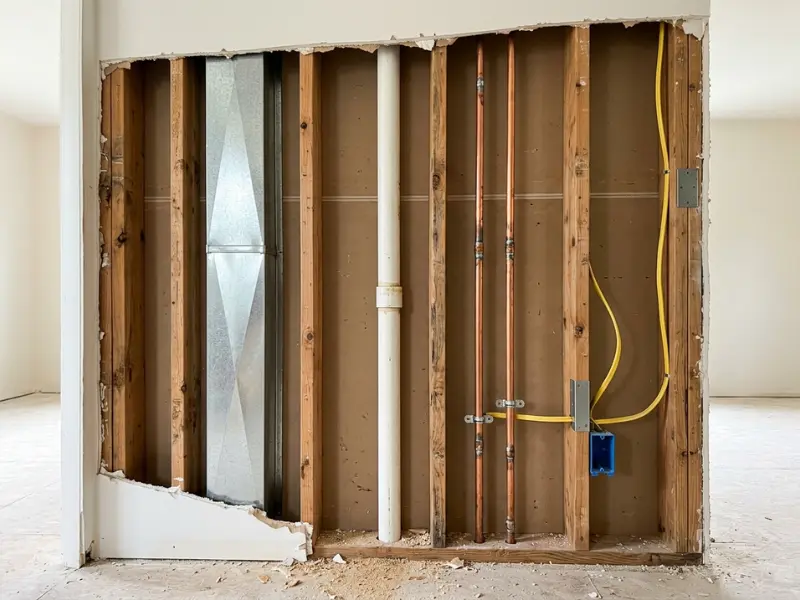
All three go in while the walls are open. Biggest and least bendable lines go first: drain pipes and ducts. Wiring goes last, because it bends around everything else.
These three trades are often called MEP, short for mechanical, electrical, and plumbing. They all need the same hollow space inside your walls, floors, and ceilings.
Why the trades are scheduled one after another
Think about packing a suitcase. Big shoes go in first. Socks fill the gaps.
The same rule works inside your walls. The biggest, least bendable item goes first:
- Drain pipes need a steady slope, so they can’t take detours
- Ducts are bulky and need wide, straight paths
- Wires bend easily, so they go in last
Crews differ on whether ducts or drain pipes go first, and both can work. Every trade source we checked puts wiring last. If wires go in first, the other trades have to fight around boxes and cables.
Plumbing rough-in (drains, supply lines, shower and tub rough-ins)
The plumber runs drain and vent pipes, hot and cold supply lines, and gas lines if you have them. Then comes the rough-in for each fixture: shower, tub, faucet, and toilet. Supply lines stay capped until the fixtures go in at the end.
Pick your fixtures before the plumber starts. A wall-mounted faucet, a rain shower, or a different valve can change where the pipes sit. Change your mind later, and you open the wall again.
Electrical rough-in (wiring, panel upgrades, lighting boxes)
The electrician runs wire through the studs and sets boxes for outlets, switches, and lights. The electrician upgrades the panel if it needs it. Nothing connects to a fixture yet. That happens at the end.
While the walls are open, add what you might want later: extra outlets, ceiling lights, and low-voltage conduit for internet and speakers. Adding them after drywall means cutting into finished walls.
Older panels can run short on capacity for big loads like EV chargers and electric ranges, so ask for a panel check.
HVAC ducts and vents
Ducts are the bulkiest part, so they need clear paths through ceilings and floors. The HVAC crew runs ducts, sets vent openings, and pulls thermostat wiring.
Plan ducts now. Running new ducts later means cutting open finished walls, which adds labor and patch work.
Once everything sits in the walls, one more person has to see it before anyone covers it up: the inspector.
Which Inspections Happen, and When Do They Block Work?
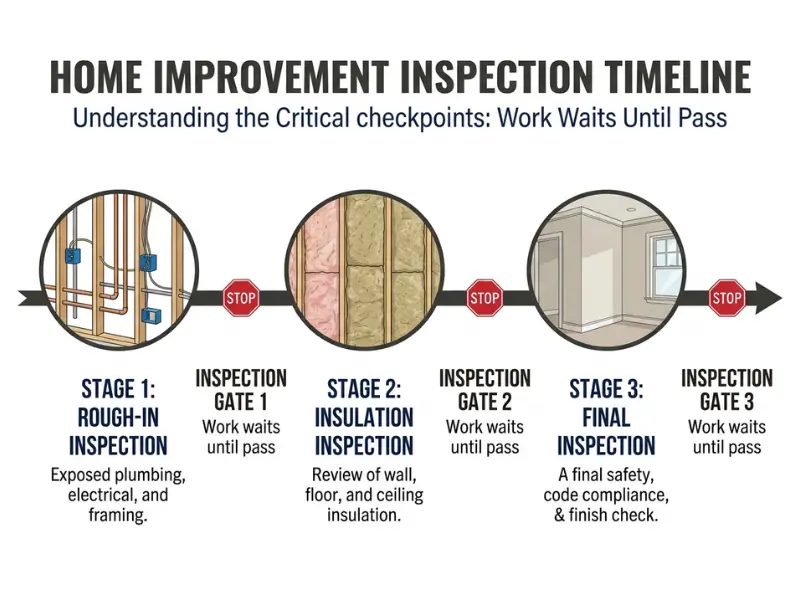
Rough-in inspections come before insulation. Inspectors check insulation before drywall. A final inspection closes the job. Skip a wait, and you open finished walls.
Inspections feel like red tape. Think of them as stop signs. At each one, work pauses until the inspector says go. Pros call these hold points. Every city and county sets its own inspection list, so ask your building department which ones your permit needs.
Rough-in inspection
After the plumbing, electrical, and HVAC rough-in, the city or county inspector looks inside your open walls. Passing it clears the way for insulation. The inspector checks that the work meets code before it disappears behind drywall.
A failed rough inspection is cheap. The walls are open, so the crew fixes the problem and the inspector comes back. The same problem found after drywall means cutting and patching.
Insulation inspection
Many areas check the insulation before drywall goes up. The inspector confirms it meets your local energy code. Make any pipe or wire changes before insulation goes in. After that, every change means pulling insulation out.
Final inspection and certificate
At the end, the inspector checks the finished work. Once it passes, your permit closes. Some projects also get a certificate of completion or occupancy. Ask your building department what yours needs.
Keep the signed-off permit in your files. Buyers and insurers may ask for it later.
Why inspector schedules cause delays
Inspectors keep their own calendars. It usually moves quickly, but a busy season can push your slot back by days. Crews can’t cover the work until it passes, so everyone waits.
Ask your contractor for a list of every hold point before work starts. Book each inspection the day that work ends. Then ask your building department how far ahead you need to book.
Once the inspector says go, the walls can finally close.
When Do Insulation and Drywall Go Up?
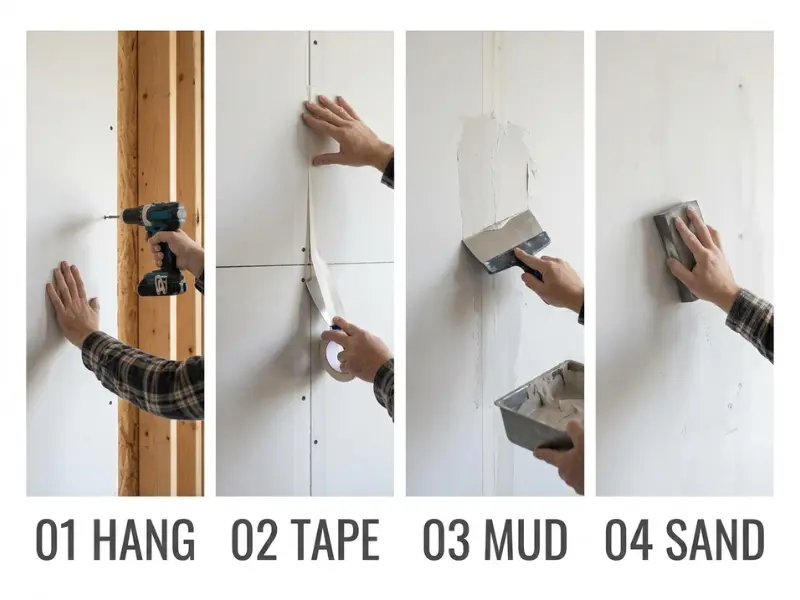
They go up after the rough-in inspection passes. Insulation goes first. Then comes drywall, which takes several days: hang, tape, mud, dry, and sand.
This is the moment your house starts to look like rooms again. It’s also the dustiest stretch of the whole project.
Insulation before drywall
Insulation fills the wall spaces. It keeps heat in during winter and out during summer, and it helps your home meet local energy code. It goes in after the rough-in passes and, where required, before the drywall inspection.
This is your last easy chance to change a wire or pipe. After insulation goes in, any change means pulling it out first.
Drywall: hang, tape, mud, dry, sand
Drywall follows five steps:
- Hang: crews screw the sheets onto the studs.
- Tape: paper or mesh tape covers every seam.
- Mud: joint compound fills seams and screw heads, usually in two to three coats.
- Dry: each coat needs time to dry, often overnight.
- Sand: crews sand the walls smooth.
That means days, not hours, even for one room. Sanding makes fine white dust. Ask your crew to seal doorways with plastic and cover your vents. If they don’t, dust settles in your ducts and blows back out for months.
Why you prime and start paint prep here
Once the walls are smooth and the rooms are empty, it’s the best time to prime. Primer seals raw drywall so paint looks even later. Drips also land on bare subfloor, not on new floors or cabinets.
With the walls closed and primed, the floor is next. And this is where even the pros argue.
Do Floors Go In Before or After Cabinets and Paint?
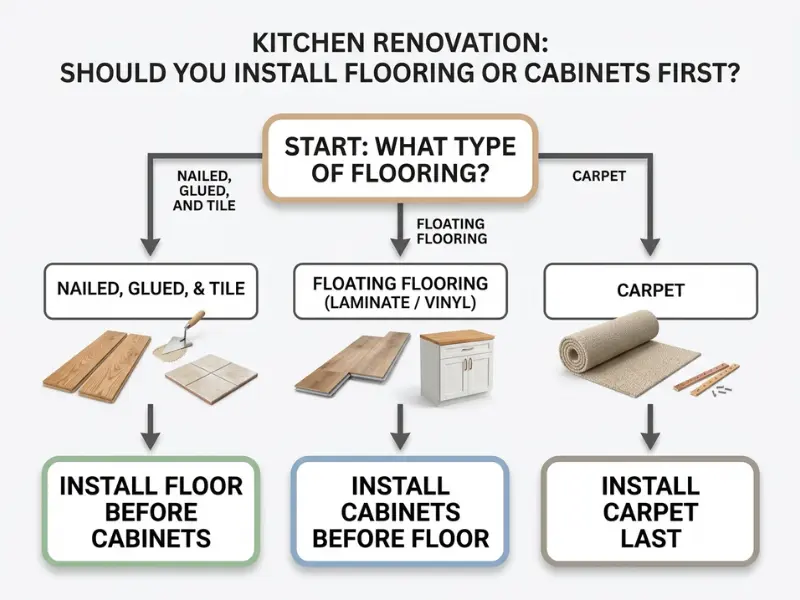
It depends on the floor type. Nailed or glued hardwood, tile, and glued-down vinyl usually go in before cabinets. Floating floors, like laminate and click-together vinyl, go in after.
This is the one spot where the home renovation order of operations splits, and pros really do disagree. You’ll see why, then get a table to settle it for your own floor.
Why contractors disagree
Both sides have good reasons. Many crews, like those in two of the guides we read, put flooring before cabinets. Another crew puts flooring near the very end. Neither is wrong.
Floors first gives you:
- A clean look, with flooring running under the cabinets
- Cabinets and appliances that line up at the right height
- Future cabinet changes with no bare patches
Cabinets first gives you:
- Cabinet crews who can’t dent or scratch new floors
- No money spent on flooring nobody sees
- Floating floors with room to expand
The floor type decides. Not the contractor’s habit.
Floating floors vs glued or nailed floors
Floating floors click together and rest on the subfloor with no glue or nails. Laminate, click-lock vinyl plank, and some engineered hardwood float. Nailed hardwood, tile, and glued vinyl bond to the subfloor.
Floating floors need room to expand and shrink with the seasons. Heavy cabinets pin them down, and the seams pop apart. Fixed floors don’t move, so cabinets can sit on them.
Hardwood vs tile vs carpet vs vinyl plank
- Nailed or glued hardwood: goes before cabinets, so heights stay even
- Tile: goes before cabinets for a continuous surface and water protection
- Carpet: goes last, after paint and most other work, because dust and damage ruin it fast
- Click-lock vinyl plank: goes after cabinets, but glued-down vinyl goes before
- Engineered hardwood: check whether it’s glued or floating before you decide
Read your floor’s install guide first. Many makers list where their warranty applies.
Where paint fits
Work from the top down. Paint ceilings and first wall coats before floors go in, so drips land on bare subfloor. Final coats wait until the end.
Site-finished hardwood is the exception to watch. Sanding it makes fine dust that sticks to wet paint. So sand and seal the floor before the final coats.
Quick decision guide
| Floor type | Order | Why |
| Nailed or glued solid hardwood | Before cabinets | Keeps heights even, makes future changes easy |
| Tile | Before cabinets | Continuous surface, guards against water |
| Glued-down vinyl | Before cabinets | Bonds to the subfloor and doesn’t move |
| Click-lock vinyl plank | After cabinets | Needs room to expand |
| Laminate | After cabinets | Heavy cabinets would pin it |
| Floating engineered hardwood | After cabinets | Same expansion rule |
| Carpet | Last | Protects it from dust and damage |
Cabinets going in first? Raise them by the thickness of your planned floor, using shims or plywood strips. If you skip this, a thick floor added later makes the openings shorter, and your dishwasher can get stuck.
With the floor question settled, the cabinets come next. And the countertop crew has strict rules about when they can show up.
When Do Cabinets, Countertops, and Backsplash Go In?
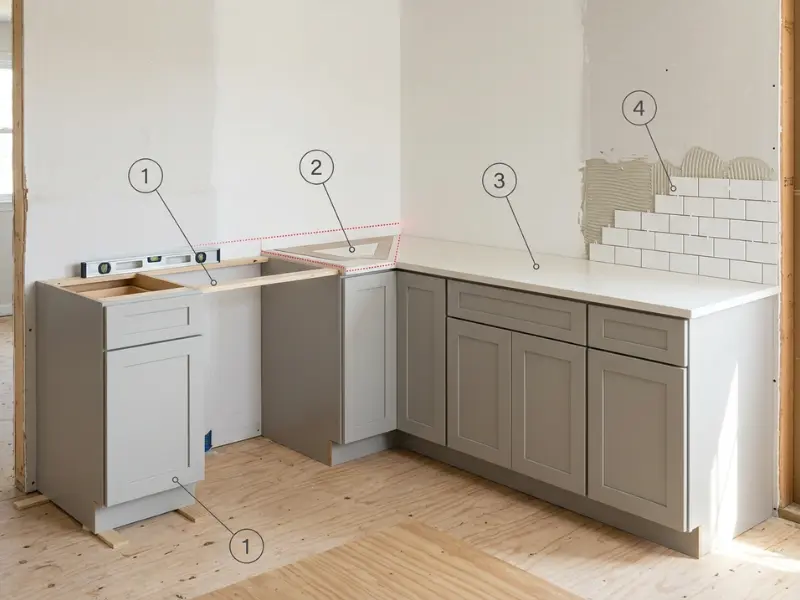
Cabinets go in first. Fabricators measure countertops only after the cabinets sit in their final spot. The backsplash goes in after the countertops, so it sits flush against them.
Three trades, one chain. Each one waits for the last. Skip a wait, and you pay for it in stone you can’t re-cut.
Install cabinets and vanities
Crews set your kitchen cabinets, bathroom vanities, and built-ins level, then fasten them to the wall studs. Level matters because stone is heavy. A granite or quartz slab weighs about 18 to 20 pounds per square foot.
Many crews need about 3 to 4 days for an average kitchen.
Why countertop measuring must wait
The stone fabricator visits after the cabinets are done, often a few days later. That visit is called countertop templating. The fabricator measures your real cabinets, not your floor plan, then cuts the stone. Stone is costly, and you can’t re-cut a wrong measurement.
From finished cabinets to installed counters, plan on 2 to 4 weeks. That’s the countertop gap. In many kitchens, the sink goes in with the countertop, so you have no working sink for those weeks. Plan where you’ll wash dishes.
Pick your sink, faucet, and cooktop before the template visit. The cutouts depend on them. Changing your mind after the template resets the fabricator’s queue.
Backsplash after countertops
The bottom edge of the backsplash sits on the counter, with a thin caulk line between them. So tile can’t start until the stone is set. A full-height stone backsplash also needs the upper cabinets, outlets, and switches in place first.
Prime and paint the wall before tile goes up. Then the backsplash goes over a finished wall, and nobody paints around fresh grout.
Where tile fits
Tile shows up in three places. Floor tile goes in early, before cabinets. Shower and tub wall tile goes in before the final fixtures. Backsplash tile goes in after the countertops.
With the cabinets, counters, and backsplash in, your rooms look nearly done. The paint isn’t.
Why Is Paint One of the Last Steps?
Painters prime early and roll the final coat late, after the other trades leave, because dust sticks to wet paint and leaves bumps.
Painters visit twice, not once. The reason is simple, and it saves you from rough walls and ruined floors.
Trim and baseboards before final paint
Door casings and window trim go on first. Baseboards go on after the floor, because they cover the small gap where the floor meets the wall. Crews then fill the nail holes and caulk the seams.
Filling and caulking come before the final coat, not after. Paint hides them. It doesn’t fix them.
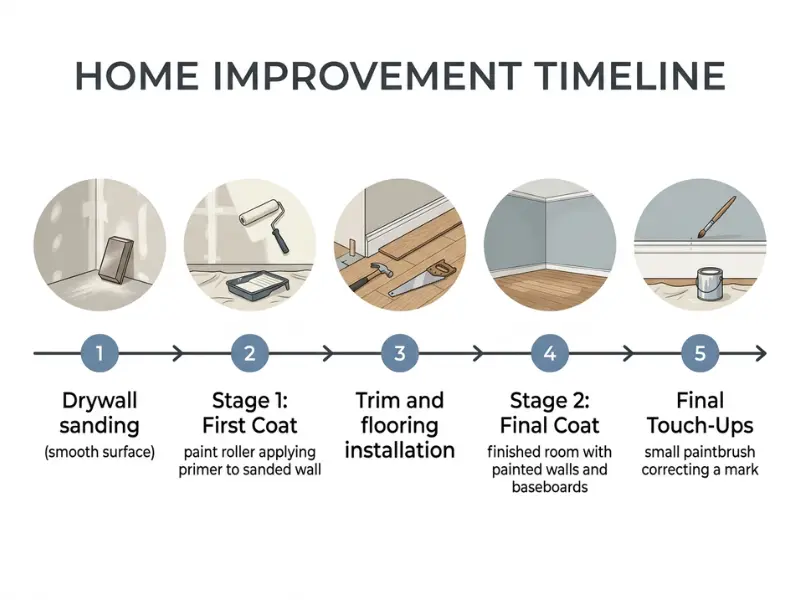
Prime early, finish late
Many guides say “paint last” or “paint early.” Both are right, for different coats.
- Stage 1: prime and put on the first coat after drywall sanding, while rooms are empty
- Stage 2: roll the final coat after trim, floors, and cabinets are done
- Touch-ups: painters return once everything else is in
Stage 1 keeps drips off your new cabinets and fixtures. Stage 2 keeps dust and scuffs off your final finish. Ask the painter to leave you a labeled can of each color for future touch-ups.
Dust is the real reason
Drywall sanding and floor sanding make most of the dust. Picture rolling a wet coat on a wall while a crew saws baseboard next door. Every speck lands in your paint.
The fix is finishing the dusty jobs first, vacuuming the room, and painting when no other trade is on site.
The house now looks finished. But the last few jobs are the ones you’ll touch and use every day.
What Happens in the Final Touches Phase?
Light fixtures, plumbing fixtures, hardware, appliances, mirrors, and wallpaper go in last. Then come the final inspection, the punch list, and a full clean.
These items chip, scratch, or suffer splashes easily, so they wait until the messy work ends. Below you’ll see what goes in, and how to check it all.
Fixtures and appliances
The plumber sets sinks, faucets, toilets, and shower trim. The electrician connects outlets, switches, and lights. The wires that waited inside your walls finally connect.
Appliances go in after the countertops. These all come last:
- Plumbing fixtures and faucets
- Light fixtures and switch plates
- Cabinet pulls and hardware
- Dishwasher, range, and refrigerator
- Mirrors and wallpaper
- Window coverings
Walkthrough and punch list
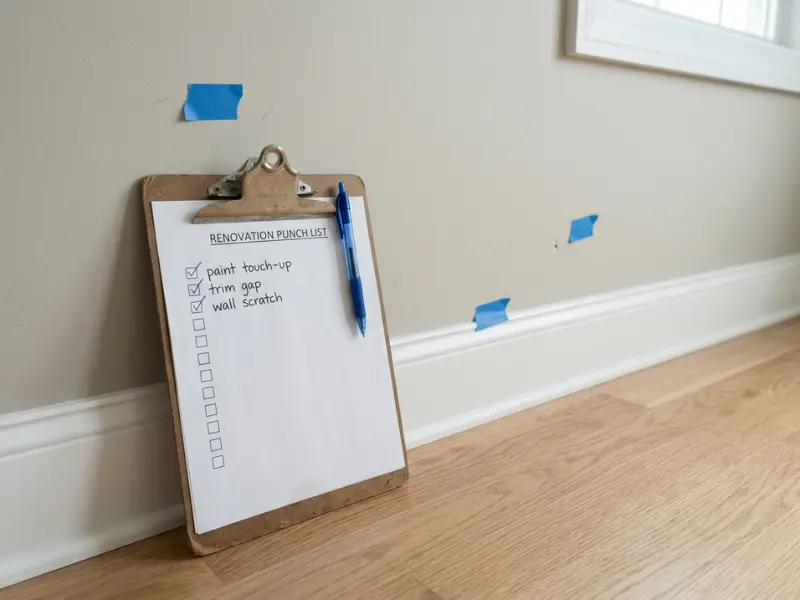
A punch list is a list of small fixes. Once the final inspection signs off, walk each room with your contractor. Mark each problem with painter’s tape, take a photo, and write down a fix date.
Test, don’t just look. Run every faucet, flush every toilet, flip every switch, run a dishwasher cycle, and open every window and door.
Then hold a flashlight flat against each wall. Side light shows roller marks and drywall flaws. Walk it in daylight, and again at night.
Final clean and move-in
Crews clean from the top down and remove dust walls and floor covers. After they leave, replace your HVAC filter, because it caught months of dust.
Collect your manuals, warranty papers, paint color names, and the signed-off permit. Keep them in one folder.
That covers a whole-house renovation from first meeting to final clean. But most people don’t renovate the whole house at once.
What Is the Order for a Kitchen or Bathroom Remodel?
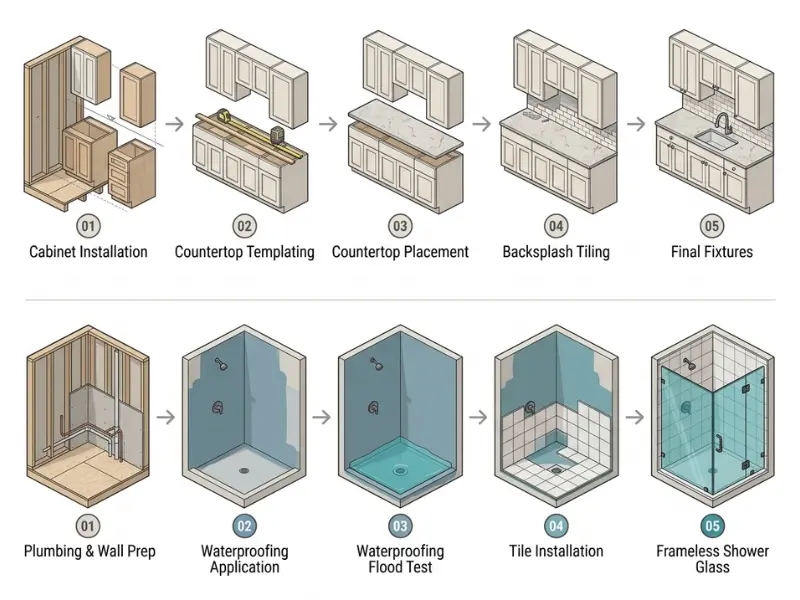
Same rule, fewer steps. Kitchen: demo, rough-in, drywall, flooring, cabinets, countertops, backsplash, fixtures. Bathroom: demo, rough-in, waterproofing, tile, vanity, fixtures.
Kitchens and bathrooms pack the most trades into the smallest space. Below are both orders, and how to handle two rooms at once.
Kitchen remodel order
- Demolition and hidden repairs
- Plumbing, electrical, and gas rough-in (gas only if you have it)
- Rough-in inspection
- Insulation, drywall, and primer
- Flooring (fixed floors go before cabinets)
- Cabinets
- Countertop template, then install
- Trim, final paint, then backsplash tile
- Sink, faucet, appliances, lights, and hardware
- Punch list and final inspection
Send your appliance spec sheets to the cabinet maker and the countertop fabricator before they build. Openings, cooktop cutouts, and vent paths all depend on the exact model.
Bathroom remodel order
- Demolition and protection
- Plumbing and electrical rough-in, including the shower valve
- Blocking for grab bars, wall-hung vanities, and shower glass
- Rough-in inspection
- Insulation, drywall, and backer board
- Shower waterproofing, then a test (pros often wait up to 24 hours)
- Tile: shower walls first, then the floor
- Final paint on the walls without tile
- Vanity, countertop, toilet, lights, and fan
- Shower glass
- Final inspection and testing
Shower glass is the surprise delay. The fabricator can’t measure until the tile is done, and custom glass can take a week or more to make. Book the measuring visit the day your tile finishes.
Two-room projects: which first
Rough in both rooms at the same time. They often share plumbing walls, and you save an inspection visit.
Then finish the bathroom first. Bathroom guides put typical remodels at about 3 to 8 weeks, and a kitchen usually has more trades and more waits. That way you get a working bathroom back while the kitchen still needs weeks of work.
Knowing the order is half the plan. The other half is knowing how many weeks each step really takes.
How Long Does Each Phase Take?
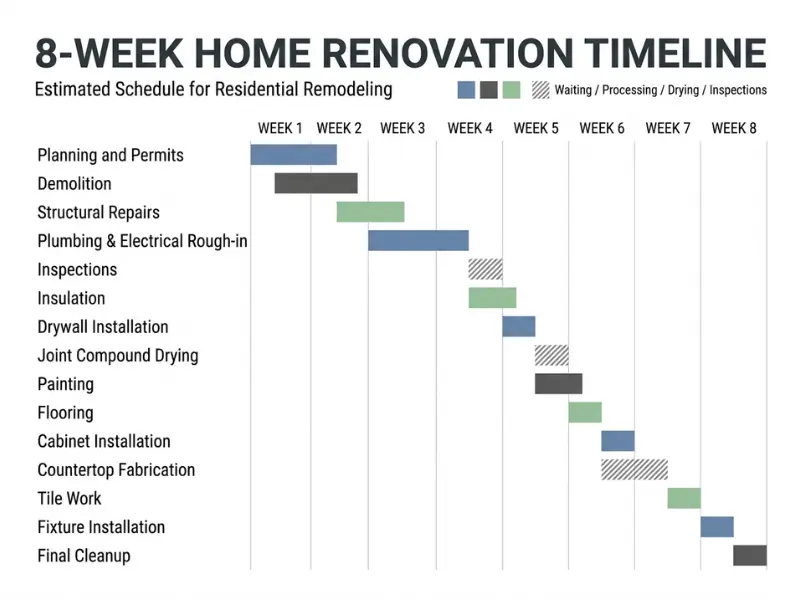
A 2,500 square foot whole house renovation can take about 8 to 10 weeks when nothing goes wrong. Scope, inspections, deliveries, and change orders push it longer.
That number comes from one contractor’s example, so your home will differ. A sample home renovation timeline follows, week by week, plus the waits that rarely make it onto the schedule.
Sample 8-week timeline
| Week | Work | Waits to plan for |
| Before week 1 | Plan, permits, orders | Permits and slow items, often weeks |
| Week 1 | Site prep and demolition | Hidden damage can add days |
| Weeks 2 to 3 | Rough work: framing, plumbing, electrical, HVAC | Rough-in inspection |
| Week 4 | Drywall and finishes | Dry time between mud coats |
| Week 5 | Interior trim and cabinetry | Countertop template and fabrication |
| Week 6 | Painting | Dry time between coats |
| Week 7 | Trades return for trim out, lighting, fixtures | Fixture deliveries |
| Week 8 | Flooring, final finishes, cleaning | Punch list and final inspection |
The right-hand column is the one that breaks schedules. Work takes days. Waits take weeks.
This contractor lays floors last, so flooring lands in week 8. With tile or nailed hardwood, flooring moves earlier.
Common causes of delay
- Scope of work: more work takes more time, materials, and labor
- Change orders: any change can mean ordering new materials
- Damaged materials: a cracked delivery means a reorder
- Inspections: city and county inspectors keep their own calendars
- Weather: rain stops exterior work
- Specialty work: custom items can need extra trades
- Mistakes: rare, but they cost days
In practice, many delays start with a late decision, not a slow crew. Pick your tile, fixtures, and paint colors before demolition day.
How to build slack into your plan
- Add two to three weeks to a 10-week estimate
- Don’t book guests or events for the week after the planned finish
- Agree on how change requests work before work starts
Even with a good schedule, some mistakes keep showing up. They’re easy to spot once you know the order.
What Are the Most Common Order Mistakes?
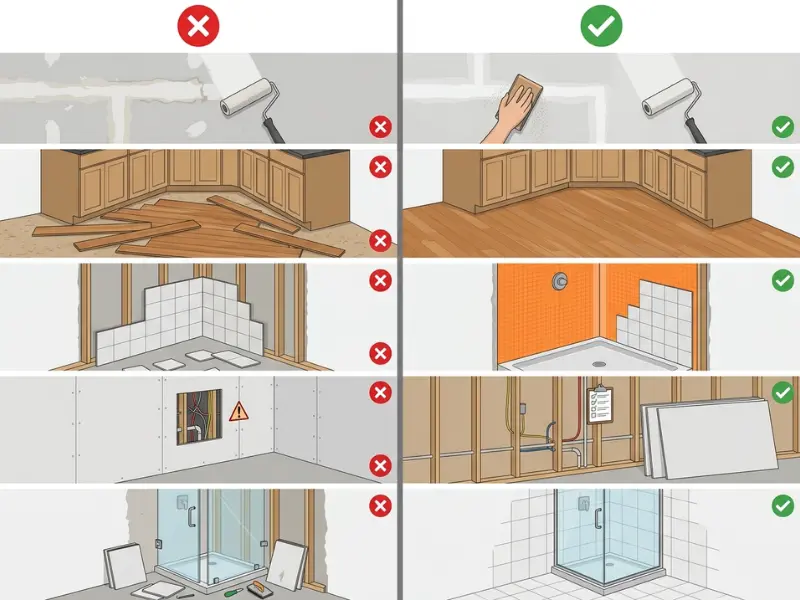
The most common order mistakes are painting before rough-in, measuring countertops early, laying floors too soon, ordering slow items late, and skipping the inspection wait. Each causes rework.
Each mistake below shows how it happens, and the quick fix.
Painting before rough-in
Crews paint the walls. Then a pipe or wire has to move. Now someone cuts the wall, patches it, and paints again.
The fix: prime only after rough-in passes. Save the final coat for the end.
Measuring countertops before cabinets are fixed
A crew takes the template on cabinets that later shift. The stone arrives cut to the wrong size, and stone can’t be re-cut.
Instead: wait until the cabinets are level and fastened. Pick the sink and cooktop first.
Installing floors before heavy trades finish
Ladders, cabinet boxes, and dragged tools dent new floors. Scratches show up in the first week.
What works: cover finished floors with protective board until the project ends. Then follow the order for your floor type.
Ordering slow items too late
The crew finishes the rough work, then waits. Cabinets are still weeks away, and the room sits gutted.
The fix: order after final measurements, and count back from your move-in date.
Skipping the inspection wait
A crew closes the walls before the inspector sees the work. The inspector can then ask you to open them again.
Instead: book the inspection the day the work ends. Nobody covers anything until it signs off.
Mistakes cost more when your family lives in the middle of them. That raises a fair question: can you stay home at all?
Can You Live in Your Home During a Renovation?
For small jobs, yes. For whole-home work, moving out during demolition and the dustiest weeks is often easier and safer.
Staying saves rent. Leaving saves time and stress. Below you’ll see how to choose, and how to stay if you must.
Dust, noise, and water shutoffs
Renovation work is loud, most working days. Dust travels through the whole house unless crews block it. Water, power, or gas will also shut off, sometimes for a full day.
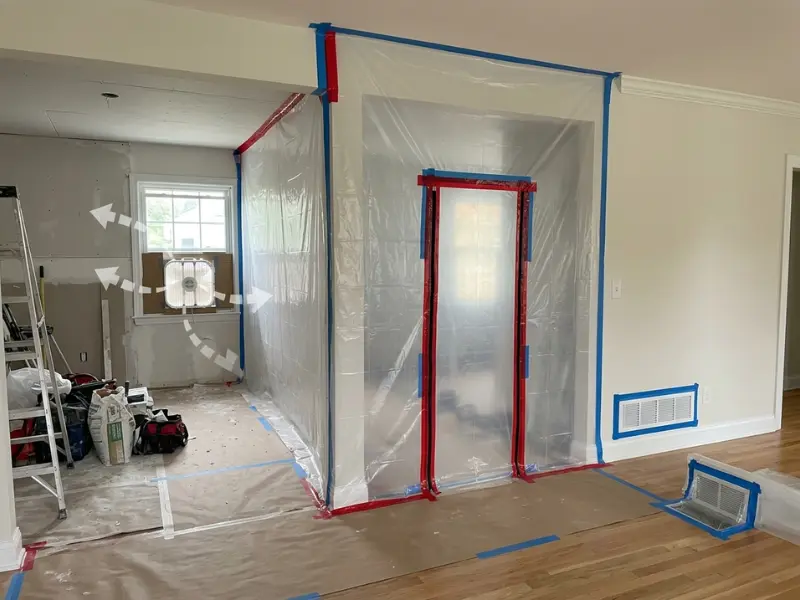
Ask your contractor how they’ll handle dust control. A sheet taped over a doorway isn’t a barrier.
Good crews use sealed plastic walls and covered vents, and on bigger jobs, fans and air filters. If anyone at home has breathing problems, or you have a baby, lean toward leaving.
Phased work to stay in part of the house
Splitting the house into zones can work. Crews finish one zone, you move in, then they start the next. Set up these basics first:
- One working bathroom
- A temporary kitchen with a microwave, a small fridge, and paper plates
- A separate entrance with a floor cover
- A closed door and taped plastic between you and the work zone
You’re living next to a small construction site, so keep walking paths clear, and keep kids and pets away from tools.
When moving out saves time and money
Move out for a full gut, or when water or power will be off for days. Crews don’t have to move your furniture or protect your belongings every day, which saves time.
Use one simple test. If your kitchen and your only full bathroom both come out, plan to leave. Compare the cost of a short rental to the extra weeks of slow, careful work around your family.
Living at home also leads to the next question: which jobs you can do yourself.
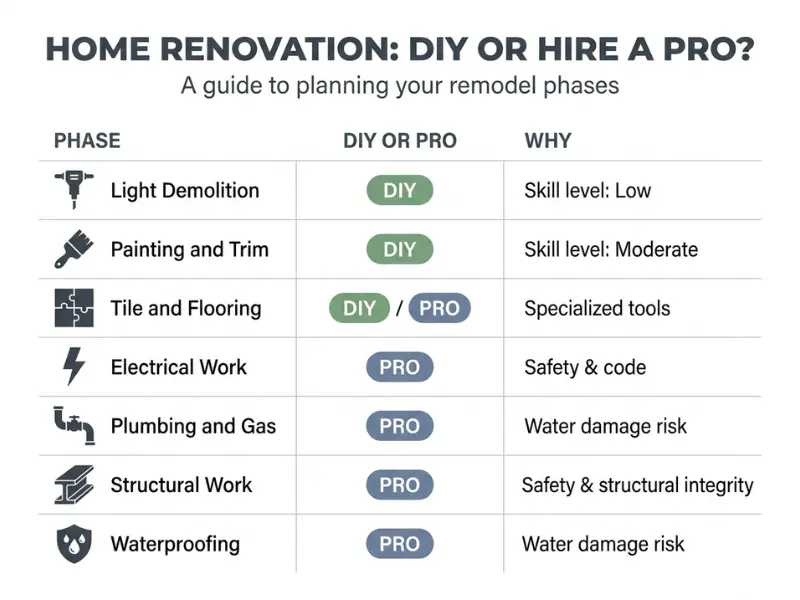
Which Steps Can You DIY, and Which Need a Pro?
Painting, trim, hardware, and light demolition are common DIY jobs. Electrical, gas, structural work, and anything needing a permit usually need a licensed pro.
Below you’ll see how to split the work, plus one simple test for the gray areas.
Safe DIY steps
- Light demo of non-structural items, once utilities are off
- Painting and priming
- Installing trim, baseboards, and cabinet hardware
- Daily cleanup and hauling debris
- Choosing and ordering tile, fixtures, and finishes
Check for wires, pipes, and gas lines inside a wall before you cut it. Have a pro confirm it isn’t load-bearing. Tile and flooring are doable with practice. Shower tile is the exception, because hidden waterproofing sits under it.
Steps to leave to licensed trades
- Gas lines
- New circuits, panel work, and rewiring
- Plumbing changes and rough-in
- HVAC ducts and equipment
- Load-bearing walls and other structural changes
- Shower waterproofing
- Work that disturbs lead or asbestos
Use the hidden test. Ask: “Will a mistake stay hidden inside a wall?” A paint mistake shows up in a day. A wiring, pipe, or waterproofing mistake can show up years later, as a leak or an electrical fault. Hidden mistakes belong to pros.
When to check local permit rules first
Permits usually cover plumbing, gas, electrical, HVAC, structural changes, and new window or door openings. Some places let homeowners do their own permitted work. Others require licensed pros. Ask your building department what your job needs.
If you hire a general contractor or a trade, check the license. In some states, hiring an unlicensed contractor can bring legal trouble for you.
With the DIY line drawn, you have every piece. The whole order sits on one page you can print.
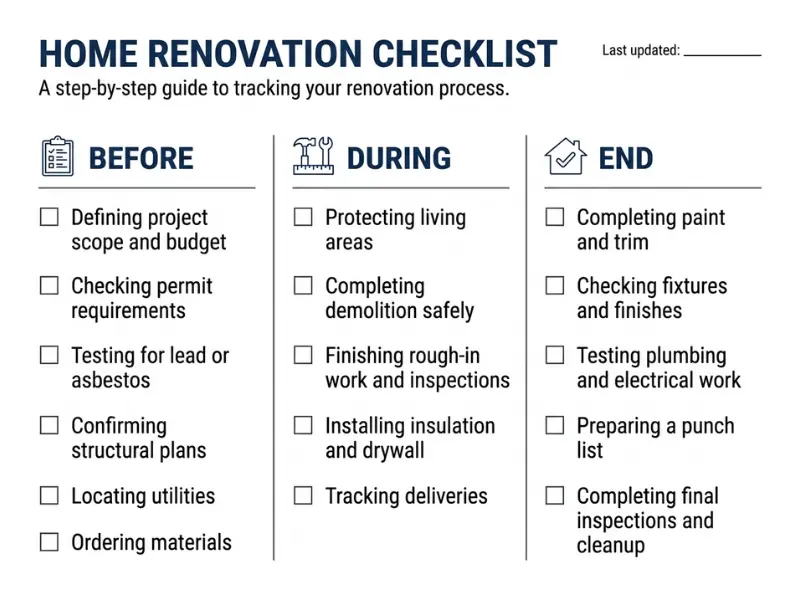
Your Home Renovation Order of Operations Checklist
Use this tick-box list to follow every phase from permits to punch list.
Print it, screenshot it, or copy it into your notes. Tick each box as the work finishes.
Before work starts
- Write your scope, room by room
- Set a budget plus a 10 to 20 percent contingency
- Call your building department about permits
- Test homes built before 1980 for lead and asbestos
- Mark load-bearing walls
- Find your water, power, and gas shutoffs
- Choose fixtures, tile, and paint colors
- Order slow items: cabinets, windows, special tile, shower glass
- Decide if you’ll stay or leave
- Ask your contractor for a list of every inspection hold point
During construction
- Demolition done and hidden damage fixed
- Photos taken of every open wall
- Framing walkthrough done: blocking, outlets, door swings
- Plumbing, electrical, and HVAC rough-in finished
- Rough-in inspection passed
- Insulation inspected, if your area requires it
- Drywall hung, taped, sanded, and primed
- Flooring installed in the right order for your floor type
- Cabinets set level
- Countertop template done, then countertops installed
- Trim, final paint, and backsplash tile finished
At the end
- Fixtures, appliances, and hardware installed
- Final inspection signed off
- Punch list walk done, with tape and photos
- Every faucet, switch, door, window, and appliance tested
- Final clean done and HVAC filter replaced
- Manuals, warranties, paint colors, and permit sign-off saved in one folder
Put two items first: inspection hold points and slow orders. The rest of the list moves smoothly once those are set.
Still have questions? These are the ones people ask most.
Frequently Asked Questions
What is the right order to renovate a house?
Start with plans and permits, then tear out, repair, frame, and run the hidden plumbing, electrical, and HVAC. After inspection, insulate, hang drywall, set floors and cabinets, then add countertops, trim, paint, and fixtures. Floors can swap with cabinets, depending on the floor type.
What should you renovate first in a house?
Fix anything that can damage the house first: roof leaks, water damage, old wiring, and structure. Then update plumbing, electrical, and HVAC while walls are open. Cosmetic work like paint and decor comes last. A pretty room on top of a leaking roof won’t last, and you’ll pay to redo it.
Do you paint or install flooring first?
Both, in stages. Prime and put on the first coat before flooring, so drips land on bare subfloor. Then install the floor. Roll the final coat last, after floors, trim, and cabinets are done. Crews sand and seal site-finished hardwood before the final coat, because floor dust sticks to wet paint.
Do cabinets go in before flooring?
Sometimes. Fixed floors, like tile, glued vinyl, and nailed or glued hardwood, usually go in first. Floating floors, such as laminate and click-lock vinyl plank, wait until the cabinets are set, because heavy cabinets would pin them down and split the seams. If cabinets go first on a thick floor, raise them by the floor’s thickness.
Do you do electrical or drywall first?
Electrical comes first in the home renovation order of operations. The electrician runs wires and sets boxes while the walls are open. After the rough-in inspection passes, insulation and drywall go up. The electrician connects outlets, switches, and light fixtures last, after paint. Adding wires later means cutting into finished walls.
How long does a whole house renovation take?
Plan on about 8 to 10 weeks for a 2,500 square foot home when nothing goes wrong, based on one contractor’s example. Planning, permits, and slow orders come before that, often adding weeks. Change orders, hidden damage, and inspection waits can stretch it further. Add two to three weeks of slack to your plan.
Do I need permits for a home renovation?
Usually yes, for bigger jobs. Permits commonly cover structural changes, plumbing, gas, electrical, HVAC, and new window or door openings. Paint, flooring, and simple cosmetic work often need none. Rules differ by city and county, so ask your local building department before you start. Your contractor may pull the permit, so ask who does.
What order should you renovate a kitchen or bathroom?
For a kitchen, go from demo to rough-in, drywall, flooring, cabinets, countertops, backsplash, and appliances. For a bathroom, go from demo to rough-in, waterproofing and test, tile, vanity, fixtures, and shower glass. Both follow the same home renovation order of operations as a whole house, just shorter, with a rough-in inspection before walls close.
Can you live in your house during a renovation?
Yes for small jobs, but whole-home work is easier and safer if you move out during demolition and the dustiest weeks. If the kitchen and your only full bathroom are both torn out, plan to leave. Staying works with phased zones, a temporary kitchen, one working bathroom, and sealed plastic barriers against dust.
How much money should you keep as a contingency for renovation?
Keep 10 to 20 percent of your budget as a contingency. Use the higher end for older homes or big layout changes. On a $60,000 project, that’s $6,000 to $12,000. Hold it in a separate account, and spend it only on surprises like rot, leaks, or old wiring found after demolition.
Conclusion
You don’t have to remember every step. Remember four things. Do the hidden work first, and let the inspector see it before the walls close.
Pick your floor order by floor type, not by habit. Order your slow items, like cabinets and shower glass, before demolition day. And plan for the waits between steps, because the waits break schedules, not the work.
Your next move is small. Print the checklist above. Walk through it with your contractor before any wall comes down. Ask for a list of inspection hold points before you sign anything. Write down your scope room by room, with your fixtures and tile picked.
Do those things, and the order is no longer a guess. You’ll know what comes next, and why. It’s a plan you can check, one box at a time.
Start with the checklist today. It takes ten minutes, and it turns the home renovation order of operations into boxes you can tick. Tick the first one, and the rest gets easier.